Lead Architect
Lead Architect is a sample-based hybrid virtual instrument that enables you to layer three different sound components (based on analog modular and digital synthesis, as well as field recordings) to create unique sounds, perfect for melodies, solos, and any other lead part you can imagine. Each part provides control over volume, panning, and effects, including reverb, delay, distortion and note-based arpeggiator and repeater FX. On the Part level, you can shape your sounds with the provided filter, LFOs, envelopes, Modulation Matrix, and effects.
Lead Architect has two pages: the Global and Part Edit page. The Global page has a minimal, sleek design, emphasizing the main elements of Lead Architect to simplify your experience playing the instrument. The Part Edit page offers many more sound design options, giving you more control of each part.
Before starting to experiment with Lead Architect, make sure you’ve downloaded the Sound Set that came bundled with Lead Architect. Lead Architect requires the Sound Set download for sounds and presets to be present within the instrument.
Global Page
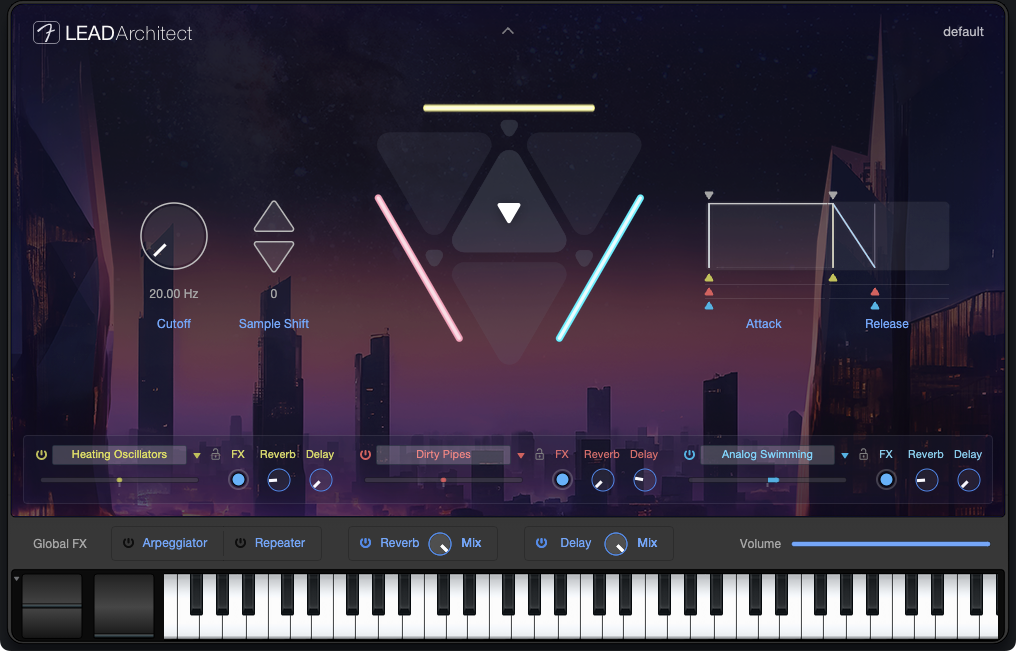
The Global Page grants users easy access to the virtual instrument’s global controls. From the Global Control Panel, you can quickly modify the volume, cutoff, sample shift, Attack and Release of all three layered Parts. Additionally, you have access to the Part Preset selection, the Global FX panel and virtual keyboard.
Instrument Presets
To begin experimenting with Lead Architect, you might consider loading one of the Instrument Presets. Once the preset is loaded, check out the sections below about adjusting the part parameters.
You can locate and load Instrument Presets by clicking the arrow of the instrument preset drop-down menu located at the top left corner of Lead Architect. Find your preset of choice and click on the preset name to load it:
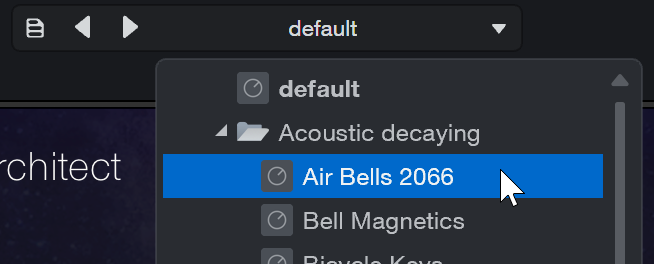
Once loaded, the instrument preset is immediately playable with your MIDI controller or by clicking the virtual keyboard at the bottom of the plug-in window.
Note: You cannot record notes using the virtual instrument keyboard. For Fender Studio Pro users who want to record notes without an external keyboard, use the QWERTY Keyboard device instead.
Main Control Panel
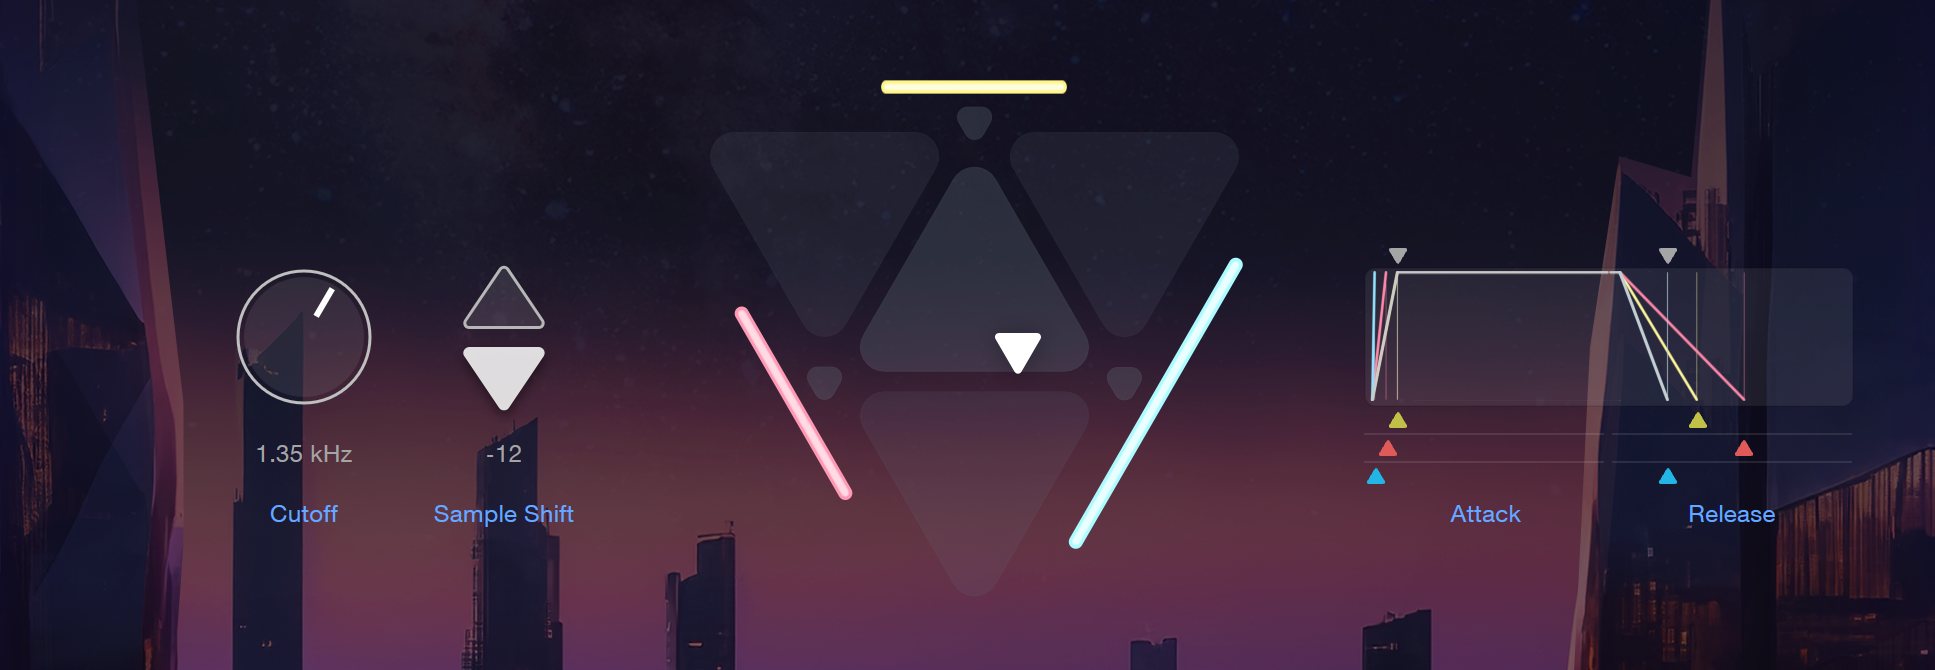
The Main Control Panel on the Global page includes the Cutoff, Sample Shift, Triangle Vector Pad, and the Attack and Release parameters.
-
Cutoff: This lets you set the corner frequency of the filter (the point in the slope of the filter at which the filter cuts incoming audio by 12 or 24 dB). In the case of a Band-Pass filter, this sets the center frequency of the passed frequency band.
-
Sample Shift: Lets you manipulate playback speed with no change in pitch. While pitch is not affected, the range of Sample Shift is -12 or +12 semitones, which references the amount of transposition that would normally be needed to shift a sample's speed the specified amount. Shift between the semitones to explore textural and harmonic changes to the parts.
-
Triangle Vector Pad: Provides combined volume control for all three parts. Move the small white triangle within the Vector Pad to seamlessly control the volume blend between the three parts. Each part has its own color, seen here on the color volume bars surrounding the pad.
-
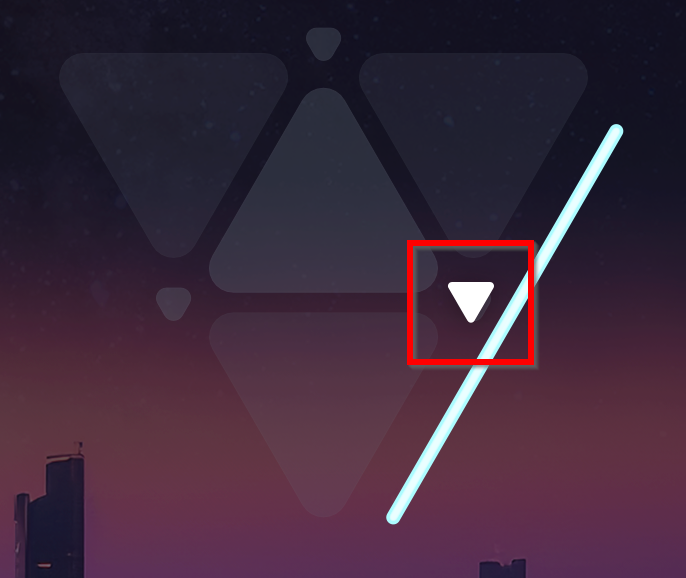
If you would like to assign all the volume to one part and mute the others, click onto the small gray triangles next to the volume bar associated with the part you’d like to solo:
-
When you hover your mouse over the corners of the Triangle Vector Pad, gray triangles appear. If you click onto these triangles, the two parts adjacent to the point will share the volume balance while the part on the opposite side of the triangle will be muted:
-
Attack Parameters: Adjusts the amount of time it takes a note's level to reach its maximum once a key has been triggered. Variable from 0 to 20s.
-
Release Parameters: Adjusts the amount of time it takes a note's level to go back to zero after a key has been released. Variable from 0 to 30s.
-
Part Selection

Under the main control panel, there are three drop-down menu boxes where you can choose your Part Preset sounds, enable/disable load sample only lock (see below), enable/disable the arpeggiator or repeater for each specific part, modify each individual part with Reverb and Delay sends to the global FX and set the panning for each part (set the bar underneath each part left or right to determine where it’s panned).
Part Presets
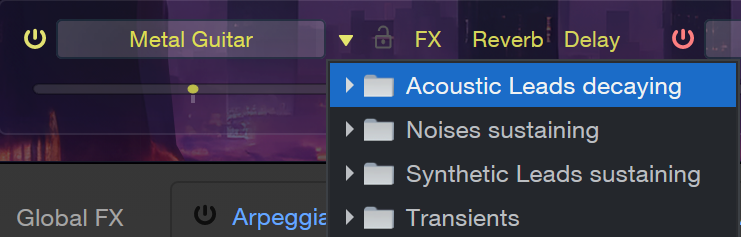
From the part preset drop-down menu boxes, you can choose from a list of preset sounds. With each instrument preset, there are three predetermined part presets, but you can swap out part presets and experiment with preset layering as desired.
Load Samples Only Lock
The “Load Samples Only” lock is located to the right of each part preset drop down box. When the lock is engaged, any changes you make to the parameters of a part will remain if you decide to change the part’s preset sound.
Saving Part Presets
You can save your own part presets after experimenting with the parameters. To do so, follow the directions below:
-
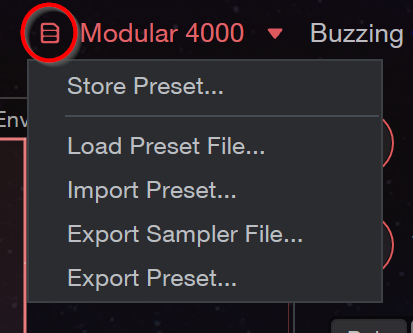
Press the colored menu located at the top right of the part edit page.
-
From the drop-down menu, select the “Store Preset” option.
-
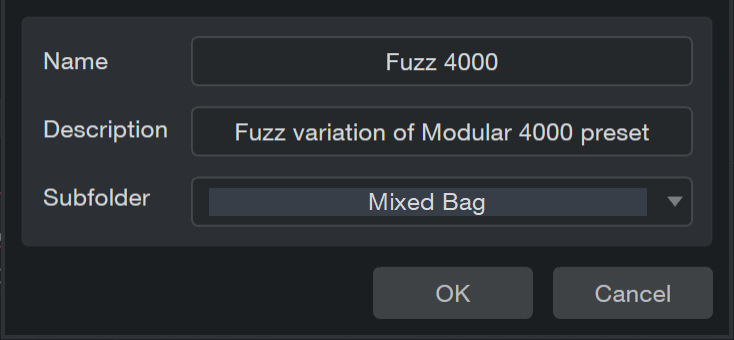
Specify the preset information you’d like and assign it to an existing or new folder for simple organization. Once you are ready, press OK and the preset will be stored for future use.
Saving Instrument Presets
Alternatively, you may wish to save a new instrument preset. When you’ve found a new layering of parts you’d like to store for later, you can save it as a new instrument preset by following a similar process:
-
Press onto the Preset Actions button at the top of the Lead Architect window.

-
Select the “Store Preset” option from the drop-down menu.
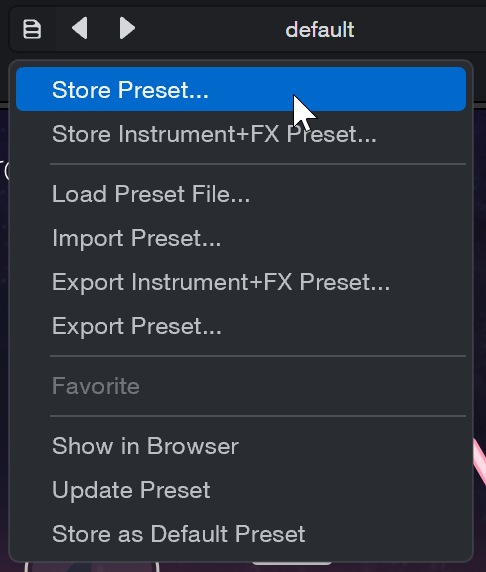
-
Specify the preset information you’d like and assign it to an existing or new folder for simple organization. Once you are ready, press OK and the preset will be stored for future use.
Global FX & the Virtual Keyboard
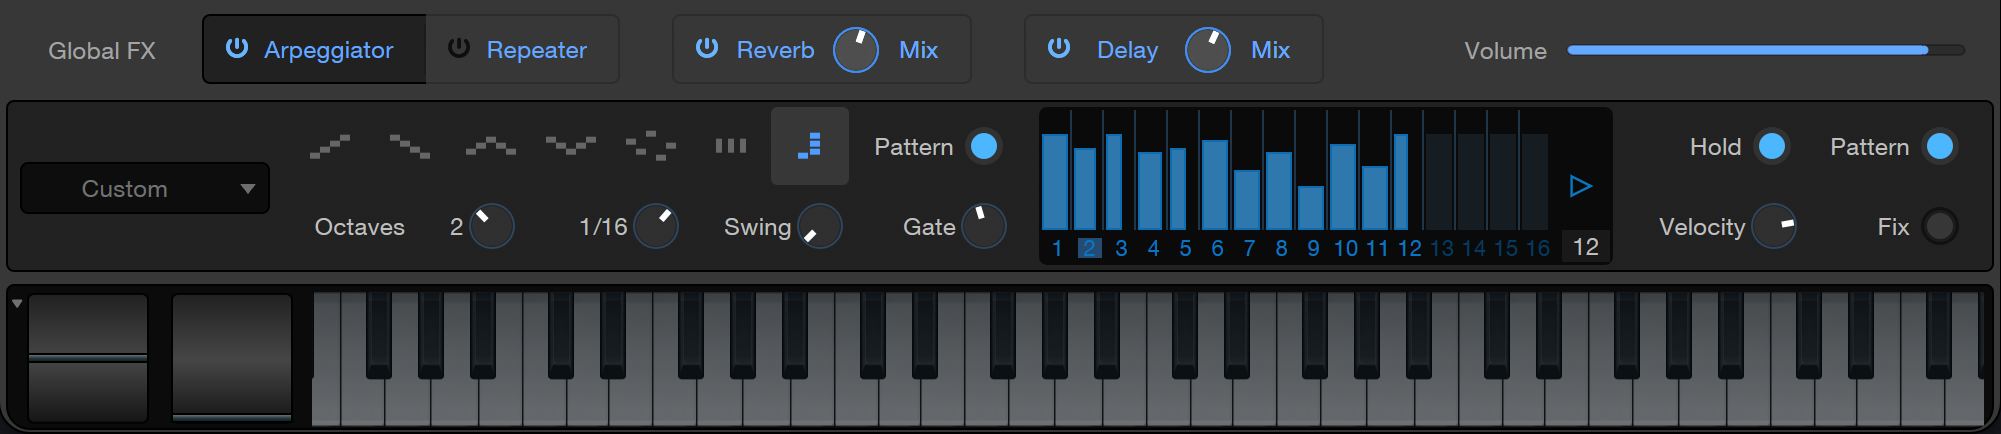
The Global page parameters located at the bottom of the window include Global FX options, including the Arpeggiator, Repeater, two FX mix knobs, and the instrument’s main volume control.
The Arpeggiator
The Arpeggiator turns chords (as well as single notes) into arpeggios—rhythmic cycles of single notes, derived from the notes currently held. You can adjust the parameters and patterns of the arpeggiator in the FX editor box that appears after enabling the Arpeggiator.
Going beyond the basics, you can use the Pattern function to create rhythmic patterns of velocity and note length that the arpeggio follows as it plays, opening many creative options for repeating musical articulations.

The following parameters and functions are available in Arpeggiator:
-
Arpeggiator Presets: Click onto the drop down Arpeggiator Preset menu to choose from several arpeggiator templates. These presets provide you a great starting point and showcase the range of sonic possibilities that the Arpeggiator affords.
-
Arpeggio Direction: Choose the note direction that creates the pattern you want from the following options:
-
Up: The arpeggio starts at the lowest held note and travels upward through the held notes, then returns to the lowest note as the arpeggio begins again.
-
Down: The arpeggio starts at the highest held note and travels downward through the held notes, then returns to the highest note as the arpeggio begins again.
-
Up/Down: The arpeggio starts at the lowest held note, travels upward to the highest, then travels back down to the lowest note, and the arpeggio begins again.
-
Down/Up: The arpeggio starts at the highest held note, travels downward to the lowest, then travels back up to the highest note, and the arpeggio begins again.
-
Random: The arpeggio plays the currently held notes in a random pattern.
-
From Input: The arpeggio pattern is derived from the order in which notes are played and held.
-
Chord Mode: The currently held chord (or single note) is repeated as long as it is held.
-
-
Pattern: This is a 32-step pattern sequencer you can use to create repeating patterns of note velocity and gate (length) that are applied to the control output of the Arpeggiator. The Pattern area contains the following controls:
-
Activate Pattern: Toggle this on or off to enable or disable the Pattern sequencer.
-
Pattern Sequencer: This series of sliders is where you'll create your velocity/gate pattern. You can click and drag each step in the sequence vertically (to set velocity) and horizontally (to set gate length). 16 steps are shown at any one time. To reach the second set of 16 steps, click the right-arrow to the right of the pattern. To return to steps 1-16, click the left-arrow to the right of the pattern.
-
Pattern Length: Lets you choose the length of the pattern.
-
-
Octave Range: Lets you extend the range of the arpeggio by mirroring the currently held notes an octave above (at a setting of 2), the two octaves above (at 3), or the three octaves above (at 4). At 1, no mirroring occurs and the arpeggio plays according to the held notes. Setting Octave Range above 1 when in Chord Mode causes an upward-rising cycle of repeated chords, an octave apart, its length determined by the Octave Range setting.
-
Rate: Lets you select a rhythmic value, determining the length of each arpeggio step. Range is from a bar to a 64th-note, in all triplet and dotted varieties.
-
Swing: Lets you add swing to the timing of the arpeggio, creating a range of rhythmic feels. For more information on swing timing, see Swing.
-
Gate: Acts as an overall note-length control. Lower settings create shorter notes, and higher settings create longer notes. When a Pattern is active, Gate works relative to the gate settings in the Pattern.
-
Hold: Enable this to hold all currently played notes. Each new chord or single note that you play replaces the previous memory and holds until the next note input is received.
-
Velocity: Acts as an overall note-velocity control. When a Pattern is active, Velocity works relative to the velocity settings in the Pattern.
-
Pattern/Fix: Switches Choose Pattern to allow Velocity data from the Pattern to control note velocity (in tandem with the Velocity control). Choose Fix to set a fixed velocity for all notes, with the Velocity control.
The Repeater
The Repeater creates rhythmic repetitions of the notes you play. These repetitions can be simple copies of incoming notes, or they can change in velocity, gate length, and pitch as the pattern plays. You can adjust the parameters of the repeater in the FX editor box that appears after enabling the Repeater.

The following parameters and features are available:
-
Repeater Presets: Click onto the drop down Repeater Preset menu to choose from several repeater templates. These presets provide you a great starting point and showcase the range of sonic possibilities that the repeater affords.
-
Rate: Lets you set the rate of repetition. When Sync is enabled, you can choose a tempo-synced rhythmic value between one bar and one 64th-note, in all triplet and dotted varieties. When Sync is disabled, you can choose a repetition frequency between 2 and 25 Hz (repetitions per second).
-
Steps: Select your desired number of repetitions (and sequencer steps), from just two steps to 32.
-
Sync: Enable Sync to snap the Rate control to rhythmic values in sync with Song tempo. Disable to set repetition speed in Hz.
-
Pitch Scale: Turn this to introduce a sloping change in pitch in the sequence over time, relative to each step's setting. At center, no slope is added. Turned left of center, you get a range of downward pitch shift slopes. Turn to the right for upward slopes.
-
Velocity Level: Acts as an overall velocity level control, scaling every step's velocity, relative to its custom setting.
-
(Velocity Relative to) Input: Enable this to derive overall repetition velocity from note input, attenuated or boosted by the setting of the Velocity Level control.
-
Velocity Scale: Turn this to introduce a sloping change in velocity in the sequence over time, relative to each step's setting. At center, no slope is added. Turned left of center, a downward slope is introduced. Turn to the right for an upward slope.
-
Gate: Acts as an overall gate length control, scaling every step's gate length, relative to its custom setting.
-
Gate Scale: Turn this to introduce a sloping change in gate length in the sequence over time, relative to each step's setting. At center, no slope is added. Turned left of center, each step in the sequence is shortened more than the last. Turn to the right, and each step is lengthened more than the last.
-
Sequencer: This lets you specify velocity, gate, and pitch values for each step in the sequence of repetitions. The following controls are available for each step:
-
Level/Gate Slider: With Individual Velocity and Gate enabled, you can click and drag the upper edge of this slider up or down to set note velocity for the current step. You can also click and drag the right edge of the slider left or right to set note gate length for the current step. With Individual Velocity and Gate disabled, moving velocity or gate sliders manipulates that setting for all steps (equivalent to turning the Velocity Level and Gate knobs).
-
Pitch: With Individual Pitch enabled, you can click and drag this slider up or down to apply a positive or negative pitch transposition to the current step. With Individual Pitch disabled, moving a pitch slider changes pitch transposition for all steps simultaneously. At 0, no transposition occurs.
-
-
Individual Velocity: Engage to enable individual setting of note velocity and gate length for each step.
-
Individual Pitch: Engage to enable individual setting of note pitch for each step.
Reverb and Delay
Beside the Repeater and Arpeggiator options on the Global FX bar, Reverb and Delay Knobs provide you control over the global reverb and delay return mix. Click onto either reverb or delay boxes and their respective parameters will appear below where you can finetune the effect to your liking.

Reverb
-
Pre-delay: Adjust the pre-delay time. Variable from 0 ms to 500 ms. Pre-delay is the amount of time before the first reverberated signals are heard.
-
Damp: Adjusts the relative amount of damping (attenuation of the upper frequencies) of the reverberated signal. Variable from 0 to 100%.
-
Reverb Size: This control lets you set the length of reverberation from the moment a sound starts, in a range between 100 ms and 10 seconds.
-
Low and High: These controls let you set the cutoff frequencies of the provided high-pass and low-pass filters, which affect only the reverb signal.
Delay
-
Ping-Pong Mode: Use this drop down menu to choose from several ping-pong delay modes.
-
Low and High: These controls let you set the cutoff frequencies of the provided high-pass and low-pass filters, which affect only the delayed signal.
-
Delay Time: This control lets you specify the length of the delay effect, in rhythmic values (such as 1/8th-note or 16th-note) relative to the song’s tempo.
-
Feedback: This control lets you set the amount of affected signal that is fed back into the Delay effect. At zero, there is just one repeat. As you increase the value, the trail of repeats grows.
Volume
The Volume Bar Adjust the output volume of the virtual instrument.
Virtual Keyboard

The virtual keyboard lets you easily click to play notes or manipulate the Pitch and Mod wheels, while auditioning or editing patches when you're away from a MIDI keyboard. The keyboard display also shows you which notes are currently being played.
The Bend wheel parameters can be edited by clicking onto the arrow beside the pitch wheel (see screenshot below). The Bend parameters let you set the pitch bend range of the Pitch wheel in semitones. The upper value sets up-bend range, while the lower value sets down-bend range. The Pitch range parameter sets the range for the per note pitch.
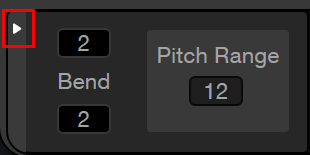
Please note that you can't record notes using this virtual keyboard. For Fender Studio Pro users who want to record notes without an external keyboard, use the QWERTY Keyboard device instead.
Part Edit Page
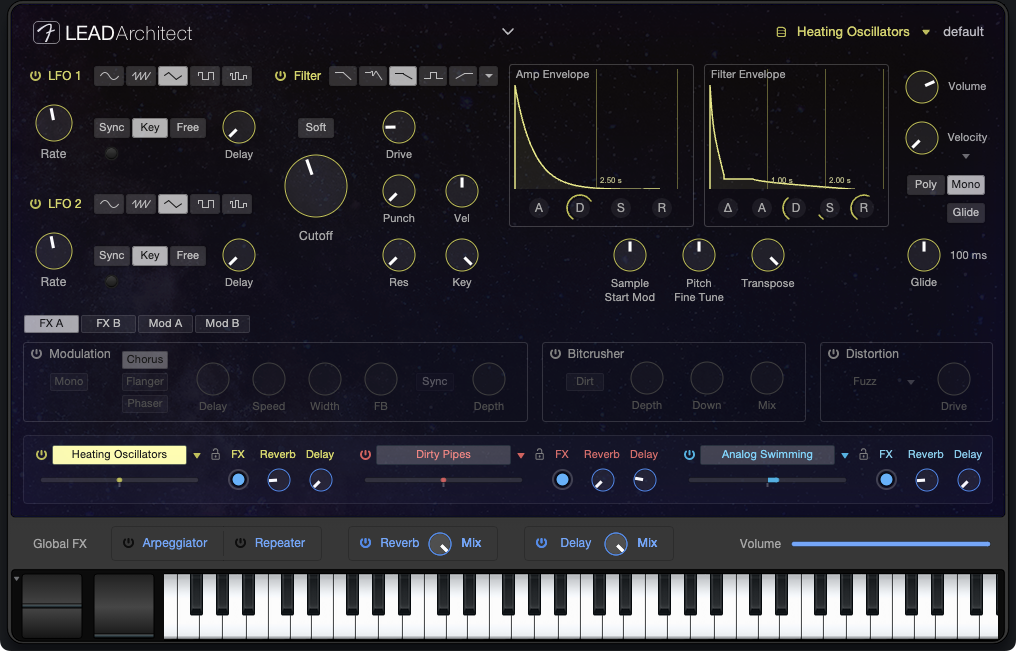
Shape each part to your liking by experimenting within the Part Edit page. The Part Edit page gives you access to additional LFO, Envelope, Modulation, EQ, and other sound parameters. There are two ways to access the Part Edit page:
-
Click onto the title box of the part you would like to edit.
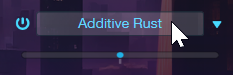
-
Click onto the arrow at the top center of the Global page. The Part Edit page of the most recently edited part will appear.

Note: To quickly identify which part is selected, the Part Edit page will be illuminated in the same color as the selected part sound. Simply click onto the desired part title box and the Part Edit page will change color to match that of the part you chose.
LFO
LFO stands for Low Frequency Oscillator, and each part has two of them. LFOs create slow-moving regular cycles of control signals that are useful for modulating other parameters over time. One common example is the way many keyboard patches respond when you move the Mod Wheel up from zero; the pitch of the oscillators wavers up and down in an expressive manner, much like the sound of vocal vibrato. This is simply an LFO modulating oscillator pitch to a degree set by the position of the mod wheel.
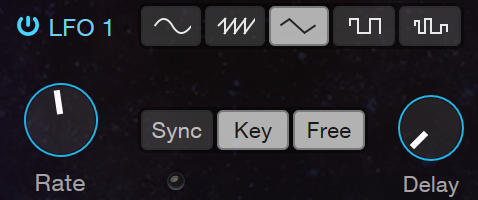
LFO 1 and 2 have identical controls, so the following explanations apply to both:
-
Bypass: Click the [LFO 1] or [LFO 2] button to turn the selected LFO on or off.
-
LFO Type: Choose between Sine, Triangle, Sawtooth, Square, and Random shapes for the oscillation of the LFO.
-
Rate: Sets the rate at which the LFO oscillates, from inaudibly low (0.01 Hz) for long, sweeping changes, all the way to higher ranges (up to 8 kHz) useful for FM and AM techniques. When the LFO's [Sync] button is engaged, Rate can be set in terms of rhythmic values relative to Song tempo (such as 1/8th-note or 1/4-note).
-
Sync: Engage this option to enable setting LFO Rate to a rhythmic value (such as 1/8th-note or 1/4-note) relative to Song tempo. Disengage to set Rate by Hz.
-
Key: Engage this option to bind LFO speed to incoming note pitch. Higher notes result in higher LFO speeds, while lower notes result in lower LFO speeds.
-
Free: Engage this option to let the LFO run continuously, resulting in a differing LFO start point for each note played. Disengage to restart the LFO waveform at the start of each note.
-
Delay: This control lets you specify an amount of time (in milliseconds) for the LFO to wait before becoming active after a note is played. This lets you do things like adding a bit of expression to held notes, or creating layers of modulation that start at different points in each note by setting distinct Delay values for each LFO.
Filter
Lead Architect offers a versatile multi-mode Filter, which lets you shape and enhance your sounds. The filter is often one of the most important defining elements to the sound of an analog synthesizer.
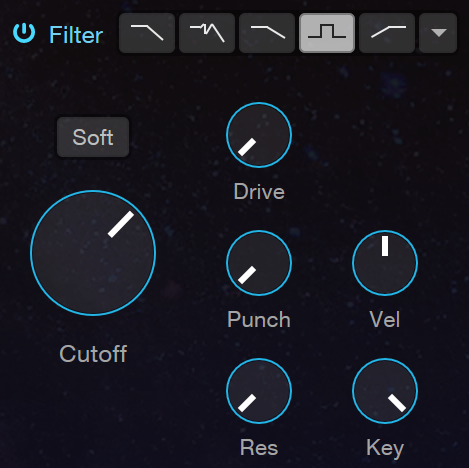
The Filter offers the following controls:
-
Bypass: Click the [Filter] button to turn the filter on or off.
-
Filter Mode: Choose from the following filter modes, each with its own sound-shaping characteristics.
-
LP 24 dB Ladder: This mode emulates a classic 24-dB-per-octave low-pass filter based on a transistor-ladder configuration, as found in many classic synthesizers. This type of filter allows frequencies below the chosen Cutoff frequency to pass through, cutting frequencies above Cutoff at a rate of 24 decibels per octave—a fairly aggressive slope.
-
LP 24 dB Zero: This is a 24-dB-per-octave low-pass filter, based on a zero-delay-feedback architecture that closely models the tone and modulation behavior of analog filters.
-
LP 12 dB Ladder: This is a low-pass filter with a 12-dB-per-octave curve, which cuts frequencies less aggressively than the 24 dB filters.
-
BP 12 dB Ladder: This is a high-pass and low-pass filter in series, known collectively as a band-pass filter. It allows a selected band of frequencies to pass through, then cuts frequencies above and below that band at a rate of 12 decibels per octave.
-
HP 12 dB Ladder: This is a high-pass filter with a 12-dB-per-octave slope. This lets frequencies above the chosen Cutoff frequency pass through, while cutting frequencies below Cutoff at a rate of 12 decibels per octave.
-
LP 12 State, BP 12 State, HP 12 State, Eco Filter: These are a set of simple, clean digital filter models, in low-pass, band-pass, high-pass, and eco (low-CPU low-pass) modes. You can access these filter types in the drop-down menu at the end of the row of Filter Mode switches.
-
Soft: This control lets you switch between two differing analog-modeled processing circuits within the filter. Engage Soft for a mellower, darker tone. Disengage it for a brighter, more aggressive sound.
-
Cutoff: This lets you set the corner frequency of the filter—the point in the slope of the filter at which the filter cuts incoming audio by 3 dB. In the case of the Band-Pass filter, this sets the center frequency of the passed frequency band.
-
Drive: This lets you specify an amount of filter overdrive, to add fullness and saturation artifacts to your sound.
-
Punch: This control lets you add a range of percussive attack to the start of each note. At the lowest setting, dynamics are unchanged. At higher settings, the sound becomes more aggressive and more readily pops through the mix.
-
Velocity (Vel): This control sets the relationship between incoming note Velocity and filter Cutoff. When set at the center, velocity does not affect cutoff. When moved to the right, the cutoff rises as note velocity increases. When moved to the left, cutoff lowers as note velocity increases.
-
Resonance (Res): This lets you set the amount of resonance in the filter, which is an emphasis centered on the chosen cutoff frequency.
-
At lower settings, the filter cuts frequencies smoothly. As you increase Res, the emphasis at the cutoff frequency becomes more pronounced, able to mimic resonances such as those in voices or acoustic instruments, as well as many classic synthesis effects.
-
At the highest settings, the filter can self-oscillate, emitting a pitched tone at the current cutoff frequency. This filter oscillation can be treated somewhat like an extra oscillator, especially in conjunction with the Key parameter.
-
-
Key: This control sets the relationship between incoming note pitch and filter cutoff. In physical instruments, higher notes tend to produce higher harmonics, brightening slightly as you go up the scale.
-
On a synthesized instrument, if the filter stays static, setting the proper tone in the lower note ranges may cause inappropriate dullness in the higher notes. Therefore, with the Key parameter, we can compensate for this and create a more natural-sounding range of timbres up and down the keyboard.
-
When Key is set all the way to the left, the filter is unaffected by note pitch. In the middle, cutoff follows note pitch subtly, allowing high notes to shine. When set all the way right, filter cutoff follows note pitch closely in a relative fashion, moving upward and downward in semitone values as notes are received. This lets you use the filter as an additional pitched oscillator or resonator when filter Res is set high.
-
Envelopes
Envelope generators are a vital part of sound synthesis, giving us the ability to shape the amplitude and timbre of our sounds within the time-scale of each note. Lead Architect has two envelope generators per part, labeled “Amp Envelope” (so named because it is hard-wired to amplitude) and “Filter Envelope”.
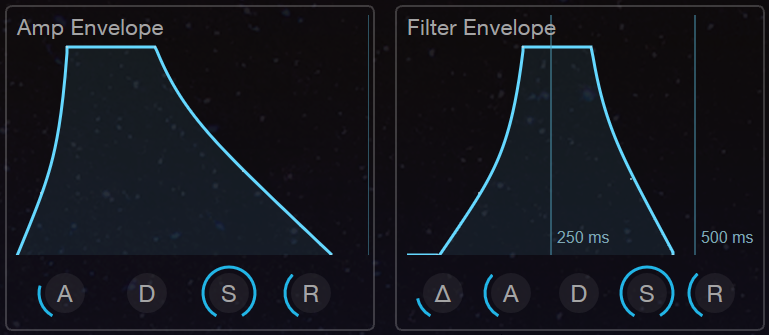
Both envelope modules are triggered when a note is played. Each envelope then outputs a control signal that follows the shape set by the following controls:
-
Delay (△ - Filter Envelope only): This control lets you specify a length of time (in ms) for the Env to pause before starting its attack phase after a note is played. This can assist in creating evolving sounds, where cycles of modulation occur at differing times over the length of a note.
-
Attack (A): This control lets you set the time required for the envelope to go from zero (silence) to full amplitude, in a range from 0 ms to 20 seconds.
-
Decay (D): This control lets you set the time required to drop from full amplitude to the sustain level, in a range from 0 ms to 20 seconds.
-
Sustain (S): This control lets you set the signal level that is maintained from the end of the decay period, until the key is released, in a range from -∞ dB (silence) to 0.0 dB (full amplitude).
-
Release (R): This control lets you set the time required to fall back to silence after the key is released, in a range from 0 ms to 30 seconds.
Envelope Graphical Display
Each envelope has a corresponding graphical display that represents the shape created by the settings of its parameters. There are handles on the corners and slopes of each envelope that you can click and drag, letting you shape the ADSR envelope and the curve between its points visually.
If you wish to lengthen any phase of the envelope beyond the time limits of the current display, simply drag the point toward the right of the graph, and the time scale adjusts to properly display the new setting.
Pitch Controls
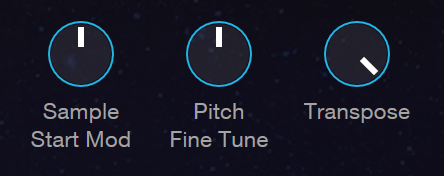
The pitch control knobs let you manipulate the way that Lead Architect plays the parts in the currently loaded preset.
-
Sample Start Mod: Lets you specify an amount of negative or positive velocity-controlled offset, applied to the point in the part which playback begins. At settings above and below the default of 0, lower-velocity notes trigger a smaller amount of sample offset, and higher-velocity notes trigger a larger amount of offset.
-
Pitch Fine Tune: Adjusts the tuning, in cents, for the selected pad. Variable from -100 to 100 cents.
-
Transpose: Adjusts the transposition in semitones for the selected pad. Variable from -48 to +48.
Part Global Settings
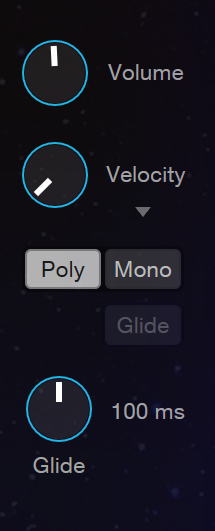
The following Global parameters let you configure Lead Architect's overall behavior and capabilities specific to the part you’re editing:
- Volume: This control lets you set the total output volume, in a range from -∞ dB (silence) to +10.0 dB (ten decibels above unity gain).
-
Velocity: This control lets you set the degree to which Lead Architect's volume is affected by note velocity, from zero (no velocity sensitivity) to 1.0 (full velocity sensitivity).
-
Poly, Mono, and Glide: Enable Poly mode to allow polyphonic playing (more than one note at a time). Enable Mono mode to play just one note at a time. When in Mono mode, you can enable Glide to cause the pitch to sweep smoothly from that of the currently held note to that of the next note, when played legato (one note played while the previous note is held). The Glide knob lets you set the rate of pitch change over time, from 1 ms to 1 second.
FX and Mods
Lead Architect offers built-in effects processors to add dimension to your sounds. They are arranged in four banks: FX A, FX B, Mod A, and Mod B. You can enable or disable each effect by clicking its name.
FX A
The first bank, FX A, includes Modulation (Chorus, Flanger, and Phaser), Bitcrusher, and Distortion effects.

Modulation

This processor creates time-based modulation effects. Choose from the following modes by clicking the [Chorus], [Flanger], or [Phaser] button.
-
Chorus: This processor creates effects similar to that of multiple identical instruments playing the same part simultaneously. The synth signal is fed through a short, modulated delay, which is then mixed with the dry signal. Chorus offers the following controls:
-
Mono: Engage this option to sum the wet (affected) signal to mono.
-
Delay: This control lets you set the length of the modulated delay. Higher settings create full-bodied chorusing effects, while lower settings create more pronounced harmonics, akin to the effects of a Flanger.
-
Speed: This control lets you set the speed at which the delay line is modulated. Lower settings create slow, sweeping effects, while higher settings create faster, more aggressive modulation.
-
Width: This control lets you set the degree to which the delay line is modulated. Lower settings produce subtler chorusing effects, while higher settings produce more pronounced changes in timbre over time.
-
Depth: This control lets you blend between the dry signal (all the way left) and the chorused signal (all the way right).
-
-
Flanger: This processor creates resonant, hollow-sounding sweeping effects. The synth signal is fed through a short, modulated delay, which is mixed with the dry signal. While similar to the workings of a Chorus effect, Flangers get their signature sound by employing smaller delay times than those used in chorusing, combined with a feedback system that can add extra resonance to the sweep. Flanger offers the following controls:
-
Mono: Engage this option to sum the wet (affected) signal to mono.
- Delay: This control lets you set the length of the modulated delay (in ms), which changes the pitch of the resultant resonance. Higher settings create lower-pitched resonance, while lower settings create resonances at a higher pitch.
-
Speed: This control lets you set the speed at which the delay line is modulated. Lower settings create slow, sweeping effects, while higher settings create faster, more aggressive modulation.
-
Width: This control lets you set the degree to which the delay line is modulated. Lower settings produce subtler flanging effects, while higher settings produce more pronounced changes in timbre over time.
-
Feedback (FB): This control lets you set the amount of output signal to feed back into the Flanger. Higher amounts of Feedback add to the resonance of the sweeping effect.
-
Sync: Engage this option to enable setting Flanger modulation speed to a rhythmic value (such as 1/8th-note or 1/4-note) relative to Song tempo. Disengage to set Rate on a continuous scale.
-
Depth: This control lets you blend between the dry signal (all the way left) and the flanged signal (all the way right).
-
-
Phaser: This processor creates dreamy, otherworldly sweeping effects. The synth signal is fed through a series of all-pass filters that alter its phase. When mixed with the dry signal, this creates a series of peaks and valleys in the frequency response that changes depending on the degree of phase shift applied. Phaser offers the following controls:
-
Mono: Engage this option to sum the wet (affected) signal to mono.
- Shift: This control lets you specify the amount of phase shift to apply. Lower settings focus the phasing effect in the lower frequencies, while higher settings focus the effect in higher frequencies.
-
Speed: This control lets you set the speed of modulation applied to the phase shift amount. Lower settings create slow, sweeping effects, while higher settings create faster, more aggressive modulation.
-
Width: This control lets you set the degree to which the phase shift amount is modulated. Lower settings produce subtler effects, while higher settings produce more pronounced changes in timbre over time.
-
Feedback (FB): This control lets you set the amount of output signal to feed back into the Phaser. Higher amounts of Feedback add to the resonance of the sweeping effect.
-
Sync: Engage this option to enable setting Phaser modulation speed to a rhythmic value (such as 1/8th-note or 1/4-note) relative to Song tempo. Disengage to set Rate on a continuous scale.
-
Depth: This control lets you blend between the dry signal (all the way left) and the phase-shifted signal (all the way right).
-
Bitcrusher
Perfect for audio abuse, Bitcrusher combines overdrive, bit-depth reduction, downsampling and clipping into a single plug-in. Bit depth reduction and downsampling are both digital resolution-reduction techniques, but each has its own sonic effect. When used in combination, they create a wide variety of tonal options.
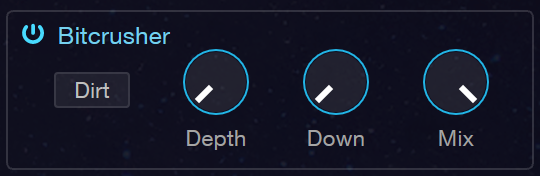
The following parameters are available in Bitcrusher:
-
Dirt: Enable this to introduce a high-frequency instability in the Bit Depth reduction effect. Good for creating aggressive sounds.
-
Depth: Lets you specify the level of Bit Depth reduction to apply, from 24-bit to 1-bit.
-
Down: Lets you specify the level of downsampling to apply.
-
Mix: Lets you blend between the dry (0%) and effected (100%) signals.
Distortion
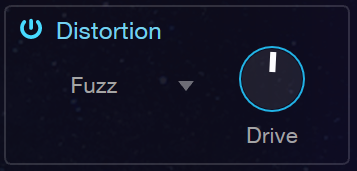
This processor adds grit and character to your sounds. The distortion FX parameters within Lead Architect are quite simple: Use the dropdown menu to choose from a variety of distortion types, from fizzy transistor fuzzes to thick, warm tube overdrives. Then, set the amount of distortion with the Drive knob.
FX B
The second bank, FX B, includes Gater, Lead/Bass EQ, and Panning FX options.

Gater
The Gater will add a rhythmic gating effect, able to create a series of syncopated breaks in the synth signal. A variety of presets are provided, each with a different rhythmic gating pattern. However, the fun really begins when you create your own.
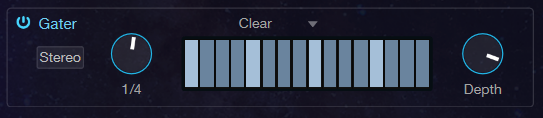
The Gater offers the following controls:
-
Stereo: Engaging this option creates a separate beat grid for each side of the stereo field. When engaged, you'll see two rows of beat steps, the top row specifying gate steps for the left channel, and the bottom row gating the right channel.
-
Beats: This control lets you set the length of the gating cycle, in rhythmic values (such as 1 bar or 1/2-note) relative to Song tempo. For example, at a setting of 1 bar, the 16 steps in the cycle repeat every bar, effectively representing 16th-notes. At a 1/2-note setting, the 16 steps repeat each half-bar, representing 32nd-note values.
-
Gate Presets: There are nine provided gate presets to choose from.
-
Gate Steps: This grid lets you specify which steps in the cycle let signals pass through, and which gate the signal to silence. Click on a step to enable or disable gating for that step.
-
Depth: This control lets you blend between the gated and dry signals, allowing for rhythmic gating effects while retaining the continuity of the synth sound.
EQ
FX B includes a graphic equalizer effect, perfect for quick tonal shaping. Set the EQ bands to emphasize or attenuate bands of frequencies to suit your needs. When a band is in the center of its range, it neither adds or subtracts. When moved above the center, it emphasizes the chosen frequency. Moved below the center, it attenuates that frequency.
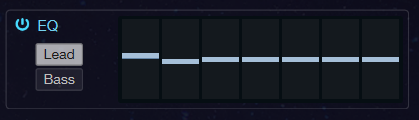
Choose between Lead mode, with frequencies chosen to suit aggressive, up-front sounds, or Bass mode, with wider-ranging frequencies that work better for basses and mellower chordal parts.
Pan
This is an auto-pan effect, which pans the synth signal left and right over time.
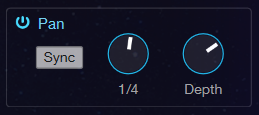
Pan offers the following controls:
-
Sync: Enable this option to set pan speed to a rhythmic value (such as 1/4-note or 16th-note) relative to Song tempo. Disable this option to set pan speed along a continuous range.
-
Speed: This control lets you set the speed at which the signal is panned left and right.
-
Depth: This control lets you set the degree to which the signal is panned. Lower settings give a subtly panned effect, while higher settings pan the signal more radically, all the way to fully left and right in each cycle.
Modulation Matrix

If you would like to map additional modulation parameters, Lead Architect provides 16 configurable modulation routings, split between two banks of eight (Mod A and Mod B). Modulation signals can be routed from a selection of incoming MIDI controller signals, including MPE data (such as Pitch Bend, Mod Wheel, Aftertouch, Poly Pressure, Note Timbre, and Pitch Control), modulation generators (such as the LFOs and envelopes), or the pitch or velocity of played notes.
These modulation signals can be used to vary most of the parameters throughout Lead Architect, including modulation sources themselves (such as LFO 2 modulating the rate of LFO 1, or the Decay of Env 2). The following list describes the functions of each option within the Modulation Matrix, from top to bottom:
-
Bypass: Each modulation slot has a bypass button at the top, which lets you enable or disable the flow of the modulation signal.
-
Main Source Selector: Use this selector to specify the modulation signal you’d like to route to the Modifier Selector or Target.
-
Modifier Selector (“Via”): Similar to the Main Source Selector, you can use this selector to specify the modulation signal you’d like to route to the Modifier Selector or Target. Additionally, you can use this selector in conjunction with the Main Source to further experiment with routing.
-
For example, if you assign a modulation source to the input selector only, that signal is routed directly to the chosen destination. In some cases, you’ll want to govern the flow of one mod source before it reaches its destination, using the signal from another mod source. On the other hand, you may want to control the output level of LFO 1 (routed to a parameter such as oscillator pitch) with the Mod Wheel. In this case, you'd choose Mod Wheel with the input selector, and LFO 1 with the modifier selector below.
-
-
Slider: The slider underneath the selectors controls the amplitude and polarity of the modulation signal. Set at its center, no modulation occurs. Move the handle right of center to send an increasing amount of the modulation signal, at its normal (positive) polarity, to the chosen destination. Move it left of center to send the signal to its destination with a negative value.
-
If the parameter you wish to modulate is set to a high value, you may want to send a negative modulation signal to it, driving the setting downward and causing more audible effects. Positive-going modulation signals are more efficient when modulating parameters set to low values.
-
-
Target Selector: A selector at the bottom of each modulation slot lets you choose the destination of the chosen modulation signals. Signals can be mapped to any of the available destinations within Lead Architect’s Part Edit page.