Adding Tracks
The first step in the mastering process is to place the desired source material into a Mastering Project.
The Browser
Just as on the Session page, the Mastering page has an integrated Browser, allowing you to browse for audio effects and files to add to your Mastering Project, including files in the current Browser Pool. Press [F5] on the keyboard, or click on Browse in the lower right hand corner of the Mastering Page interface, to open the Browser.
Add a Session
Any Session created in Fender Studio Pro can be added directly to a Mastering Project by importing the Session file into the Mastering Project. There is no need to create a mixdown of the Session first, as this process is automated.
By default, your Session files are contained in the Content/Sessions folder of the File Browser, with each Session file contained in its own Session folder. To add a Session to your Mastering Project, browse to the desired Session in the File Browser and then click-and-drag the Session file to the Track column or Track Lane.
Adding the Session to your Mastering Project places it in the Track column. If no master file exists for the Session, you are asked if you would like to create a mix of the current state of the Session, which can then be rendered and added to the Track Lane.
When Fender Studio Pro renders a mix of the Session you added, the length of the mix is determined by the Session Start and End markers, as seen in the Marker Track of the Arrange view. Be sure these markers are set to the desired locations in the Session.
Track Time

As you edit Sessions within your Mastering Project, it is useful to be able to keep track of where you are in time within each Session, as well as the entirety of your Mastering Project. When you place the cursor along the timeline, the Track Time display in the transport shows you the position of the cursor within the current Session, and the main time display shows the cursor position within the whole Mastering Project.
Add an Audio File
Of course, any Wave, Ogg Vorbis, AIFF, REX, or MP3 audio file can also be added to the Mastering Project by dragging it into the Mastering Project from the Browser, just as you would with a Session. Imported MP3 files are converted to Wave format using the sample rate of the current Mastering Project.
Track Column
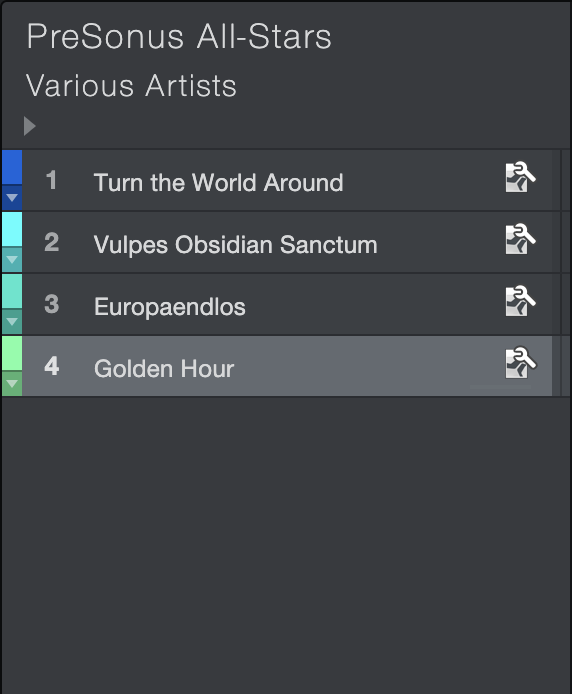
All Sessions and audio files in your Mastering Project are listed vertically in the Track column, with the name of the Session or audio file clearly displayed.
Meta-Information
At the top of the Track column, you can see Album and Artist meta-information fields. To edit these fields, click in the space next to the field, type your text, and then press Enter. If you want to enter further metadata for the album as a whole, click the small triangle button below the Artist field, and enter your information as needed.
Beneath the color-coding bar to the left of each Track in the Track Column, there is a down-arrow button. Click on this button to reveal all other meta-information fields for that Track. These fields may be edited on a Track-by-Track basis, or multiple Tracks may be selected and their fields edited simultaneously.
To copy meta-information from a single Track to all Tracks in your Mastering Project, [Right]/[Ctrl]-click the Track and choose "Copy Meta-information to All Tracks" from the pop-up menu.
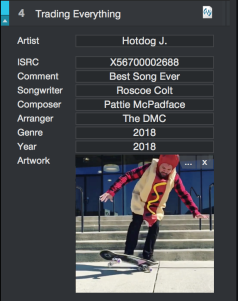
Meta-information is used when publishing your Mastering Project to any medium. You should fill in this information so your production is accurately labeled when published and distributed to your fans. When selecting artwork, the image size is limited to 1400x1400 pixels, and can be automatically scaled to fit.
Meta-information that has been filled in for any Session is automatically imported to any Mastering Project that includes the Session, Any changes made to the meta-information of a Session after import into a Mastering Project are not automatically applied to Session meta-information inside a Mastering Project, and must be updated manually.
Auto-Incrementing ISRC Codes
In most cases, ISRC codes are assigned sequentially to each track in an album, increasing by one with each subsequent track. Because of this, if you enter an ISRC code in the meta-information of the first Track in your Mastering Project, a dialog pops up, asking if you'd like to automatically assign incrementing ISRC codes to the rest of your Tracks. Press [Yes] if so, or [No] if you'd rather enter them manually. If track order or selection changes later on, you can always re-assign the ISRC code for the first Track in your Mastering Project to be prompted again to auto-assign the rest.
Pause
The timing between Tracks is an important creative part of the mastering process. In Fender Studio Pro, this is managed by your Tracks’ Pause settings.
To change a Track’s Pause setting, click in the Pause field for a Track in the Track Column and type in a value or click-and-drag the audio Events in the Timeline. You can also group-select by Shift-clicking multiple Tracks to quickly apply a consistent Pause setting to several Tracks. If the pause field is not visible on the Track Controls, extend the Track height from "Small" to "Normal" with the buttons on the bottom right.
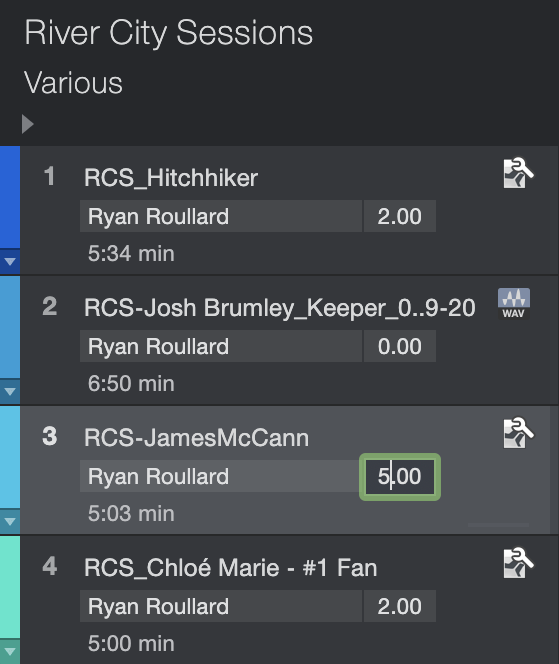
By default, the first Track added to a Mastering Project will have a two-second Pause at the beginning of the Mastering Project. The Pause settings can be set to any amount of time between 2 to 10 seconds. In order to stay in compliance with the Red Book CD Format, pauses can't be set to anything shorter than 2 seconds. The Red Book CD Standard specifies that a pause must be a multiple of 1/75 seconds ("CD Frame"), which is why some manually set values might be rounded insignificantly.
Subsequent Tracks added to the Mastering Project have no Pause inserted between them (more accurately, a Pause of zero seconds). This allows for continuous back-to-back Tracks in a finished album or gapless crossfades from one Session to another.
This pause is ignored when exporting tracks individually using Digital Release.
CD Time Display
This display shows the CD Length of your Mastering Project based on the total length of all included audio materials.