Managing Your Content
Content management and file management can become unwieldy when working with digital audio workstation software due to the sheer volume of loops, effects, song ideas, individual tracks, and so on. In Fender Studio Pro, you only need to locate your preexisting content once, after which all of the locations are remembered. Any content you create using Fender Studio Pro is similarly managed. In Fender Studio Pro, your content is kept in distinct categories.
The following describes the process of managing your content using the Studio Pro/Options/Locations (macOS: Preferences/Locations) menu.
User Data
Any content you create using Fender Studio Pro is automatically stored in the location you specify. This includes Sessions, Mastering Projects, Shows, Effects Presets, and all of the files these categories contain. All of your creative output can be logically organized and kept in a single place, which makes future location and backup a breeze.
When creating a new Sessions, Mastering Project, or Show, the User Data folder is the default save location. While we recommend using this location, you can specify any save location when a new one is created.
-
Engage the Enable Autosave option to automatically save any open document at a specified interval of time.
-
Engage the Use cached plug-in data on save option to make sure that any changes that have been made to the plug-in parameters are saved when the Session is saved.
-
Engage the Ask to Copy External Files when Saving Session feature to be given the option to consolidate any outside files to the central data folder when saving a Session.
File Types
All supported file extensions are listed in the Studio Pro/Options/Locations/File Types (macOS: Preferences/Locations/File Types) menu. Only these supported file types are displayed in the Browser.
It is possible to add file extensions to this list by clicking on the [Add...] button. In the pop-up menu, you can choose an icon, enter the file extension, and provide a description for the file type. Select a user-added extension from the list and click on Remove to remove it.
Sound Sets
Preconfigured packages of loops and samples are bundled with Fender Studio Pro. The Browser’s Sound Sets folder makes finding this content quick and easy. These packages also contain information about each content vendor, which is displayed in the Browser when a package is selected. Click on the Visit Website link in the Browser for more information about the vendor and the content they supply.
While default paths can’t be removed, it is possible to add custom folder paths for Sound Sets. To do so, navigate to the Install Options from the Fender Studio Pro Installation window and click onto the […] option beside the “Studio Pro Sound Sets” file location box:
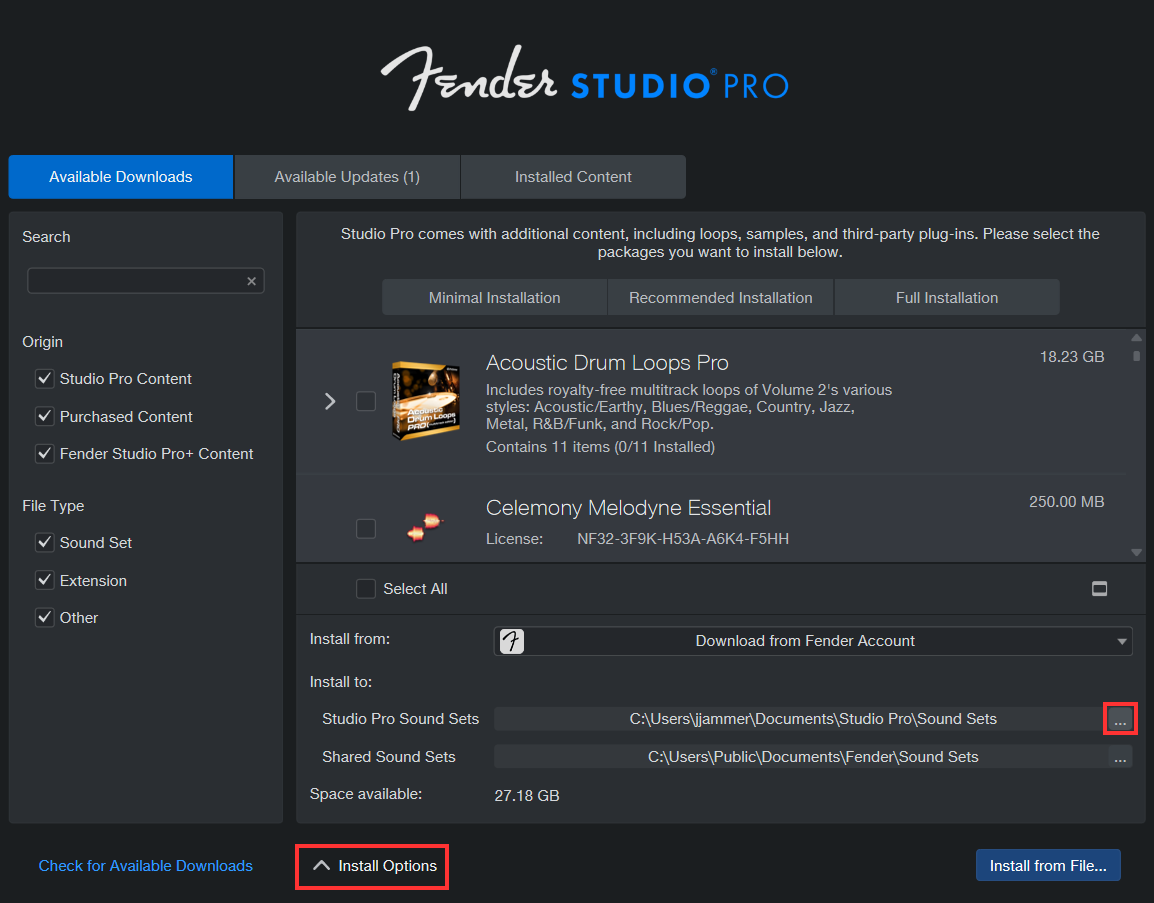
If you are using a custom location, such as an external drive, for installing sound sets, please note the following:
Saving Sound Sets to a custom user location
Fender Studio Pro always uses the default User Data location (which you can set yourself) and an additional shared location to store the sound sets. Note that it does not reset the file paths. If you reconnect a disconnected external drive, you will need to set the location in the Installation dialog to the external drive path so that when you download content, such as sound sets, everything gets installed to the correct place.
Saving Sound Sets to the OneDrive
If OneDrive syncs the Documents folder, Windows puts the Documents folder in the OneDrive folder and changes the actual file path this way. This is Operating System behavior and not something Fender Studio Pro can control. To fix this, we recommend that you do not sync in this way. Instead, it would be better to remove the Documents folder from OneDrive and have a manual sync folder where you can drag your Session folders into instead of syncing your library folders, such as a Documents folder in OneDrive.
Instrument Library
Fender Studio Pro includes a native virtual instrument called Presence that utilizes a cross-platform sample library format, as well as standard libraries in Giga, EXS, Kontakt (version 4 and below), and Sound Font (SF2) formats. Using the Instrument Library function, you can tell Fender Studio Pro where your sound sets are located, giving you access to them as presets in Presence.
To add sound library file locations to your Instrument Library, in the Studio Pro/Options/Locations/Instrument Library (macOS: Preferences/Locations/Instrument Library) menu, click on the [Add...] button and specify a file location, then click OK. You can specify as many locations as you need.
For more information on the Presence built-in virtual instrument, refer to the Presence section.
VST Plug-ins
When Fender Studio Pro starts for the first time, most of your plug-ins are located automatically and are ready to use immediately. If Fender Studio Pro fails to find certain plug-ins, adding them is easy.
To add any missing VST plug-ins, navigate to the Studio Pro/Options/Locations/VST Plug-ins (macOS: Preferences/Locations/VST Plug-ins) menu and click on the [Add...] button, then specify a location and click OK. You can also drag-and-drop any folder from the Explorer/Finder into the Locations list. Fender Studio Pro then scans these locations at startup, including searching for new plug-ins you’ve added. You can always add more locations if needed.
AU and VST 3 have their own pre-set file path in the OS, and for this reason, they are not included in alternative path options.
Failed Plug-ins
If any plug-in fails to start correctly when scanned at startup, a notice appears next to its name in the startup message list, and a warning message is shown. If the plug-in continues to fail at startup—for instance, if it is not authorized correctly or a required iLok key is not present—Fender Studio Pro puts the plug-in in a blocklist and ignores it at startup from that point on.
To reset this blocklist and force Fender Studio Pro to scan missing plug-ins again at startup, navigate to Studio Pro/Options/Locations/VST Plug-ins (macOS: Preferences/Locations/VST Plug-ins) and click on [Reset Blocklist]. The next time you start Fender Studio Pro, the previously blocklisted plug-ins are scanned again. If the issues that caused the plug-ins to fail the scan have been resolved, the plug-ins are made available.
It’s also possible that a third-party plug-in may fail to function correctly while not causing a crash. In this instance, you should receive the error message: "The following plug-ins didn't work as expected: <Plugin_Name.vst3>. Please save your work and restart Fender Studio Pro." You’ll then be presented with an option to add the malfunctioning plug-in to Fender Studio Pro’s blocklist.
VST Format Support
Fender Studio Pro supports VST 2.4 (including VSTXML for hierarchical parameter structure) and VST 3.
Backup and Restore
If you’re a Fender Studio Pro+ member, you can use your available Fender Studio Pro+ cloud storage to backup your complete user settings. You may create individual backups for different computers, artists or projects. The number of backups is only limited by the available cloud storage space.
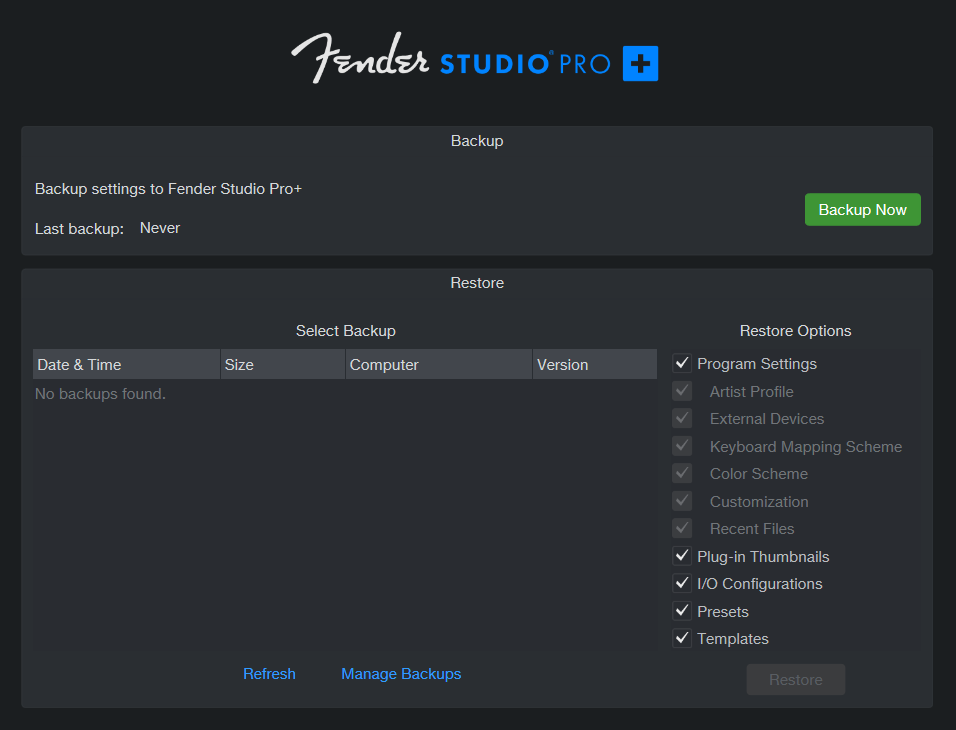
To backup your settings to Fender Studio Pro+, select Backup and Restore from the Fender Studio Pro menu. In the Backup and Restore window, click the [Backup Now] button to initiate the backup process. Backups already saved to Fender Studio Pro+ will be listed in the Restore section of the window.
To Restore any or all settings from a cloud backup to the current computer, first select a backup from the list, then check which parts of the backup to restore in the Restore Options list. These include program settings, plug-in thumbnails, I/O configurations, presets, templates and macros. Any options unchecked will remain unchanged. With a backup and options selected, click the [Restore] button to initiate the download and restore process.
When restoring a backup that originates from another system and contains Sound Set paths that cannot be resolved on the current system, the path is reset to default.