Sound Variations
About Sound Variations
Modern sampled instruments often ship with many different articulations, techniques, and expressions. A sampled violin, for example, might have many different techniques just in bowed sounds: staccato, legato, sul pont, tremolo, harmonics, and so on. Of course, having this wide variety of techniques and articulations available requires a solution for triggering them during playback or performance—In Fender Studio Pro, Sound Variations are that solution.
Sound Variations have been developed and expanded from Fender Studio Pro’s Key Switches, which are themselves a system of triggering performance articulations via Note Events that lay below or above a virtual instrument’s performance register. For example, a C0 Key Switch note, outside the musical range of a violin, might be used to trigger a legato variation, and C#0 might trigger a pizzicato variation.
MIDI notes from an external controller keyboard can be used to trigger simple or complex Sound Variations via pre-defined Key Switches—that's the input side. On the output side (from Fender Studio Pro to the virtual instrument), an Activation Sequence is then used to trigger the desired articulation. Activation Sequences can include more than just Note On / Off messages; they can also employ MIDI CC data and program/bank changes—as well as combinations of all of these.
...but first, a bit about Key Switches.
As of version 5.2 of Fender Studio Pro, Key Switches have been re-imagined as Sound Variations! No functionality has been lost in this improvement. Any legacy Sessions or Key Switch Maps created in previous versions of Fender Studio Pro that use Key Switches will enjoy full backward-compatibility when opened in 5.2 or later. Note that third-party instruments will likely still use the term “Key Switches” to describe their articulation functionality. That’s fine, they’ll still work great with Sound Variations.
Assigning Sound Variations to Note Events via Right-click
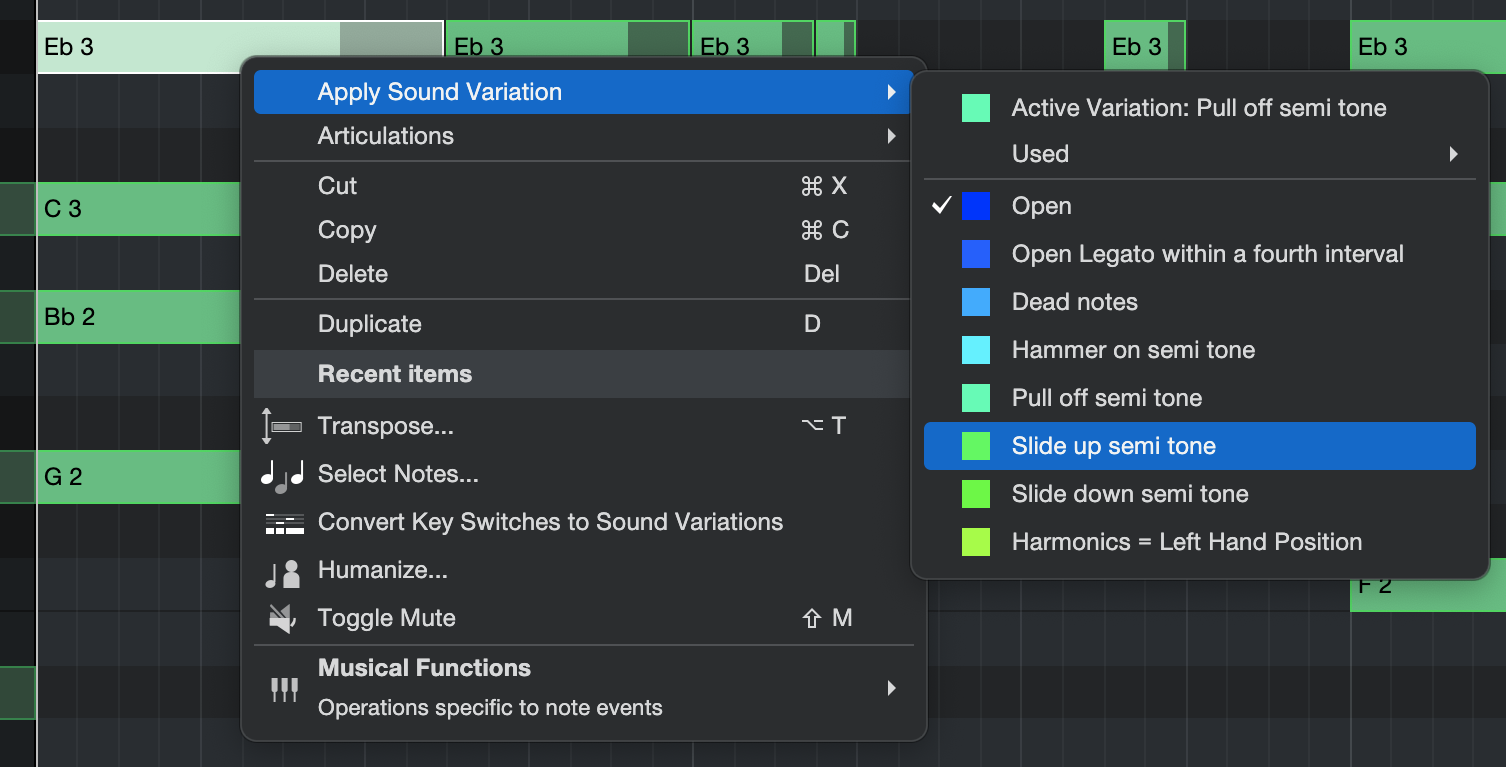
Fender Studio Pro’s Note Editor offers a quick and easy way for you to enter Sound Variations via a right-click contextual menu.
Stay mindful that Sound Variations display in the Automation Lane, not the Note Editor.
-
Create an Instrument Track and load “Nylon Guitar Full” from the Presence core library.
-
Add a few notes via the Paint tool, or drag and drop a MIDI file to this new track.
-
Open the Note Editor [F2] if it’s not already open.
-
Click the Show/hide Automation Lanes button (
 ), and then click the Sound Variation Parameter tab at the top of the lane. This tab is available in the Piano and Drum views, and will display below the Note Editor.
 -
[Right-click] a Note Event in the Note Editor and mouse over “Apply Sound Variation” from the contextual pop-up menu. You’ll receive a submenu of Variations to choose from. Click “Open” for an open-string sound.
-
[Right-click] another Note Event. From the contextual pop-up menu, choose “Hammer-on.”
-
Press the spacebar or [Left-Click] the Play button to play your track. You should hear that any Note Events played coincident with the “Open” Sound Variation will sound normal, while Notes played coincident with the “Hammer-On” Key Switch will sound hammered-on.
-
Experiment! Assign different Sound Variations across your Session, if you like, and listen back. It’s quite addictive.
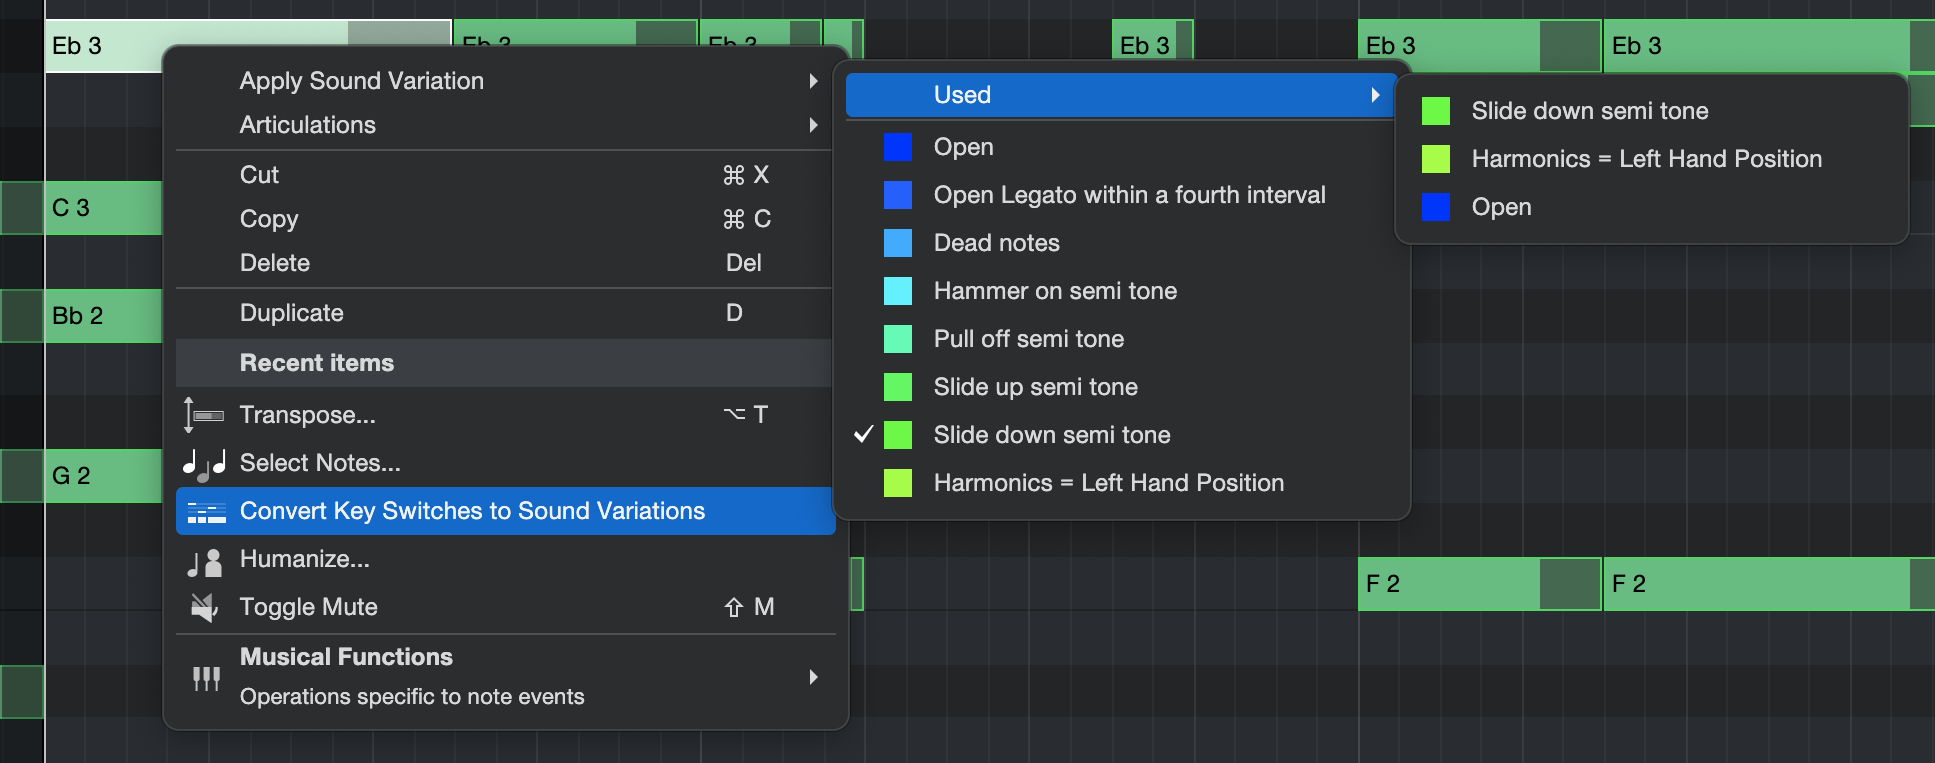
From the right-click contextual menu, you can also select from an efficient list of up to ten recently-used Sound Variations under “Used.” This can dramatically speed up your work-flow when using vast sound libraries and grants you quick access to your favorite Variations.
Keep in mind that Sound Variations will be applied to all coincident Notes, and as such you won’t be able to hear multiple articulations simultaneously. For example, you won’t be able to program a chord where the high notes use “Hammer-on” and the low notes use “Open.”
Assigning Sound Variations using the Paint Tool inside the Sound Variations Automation Lane
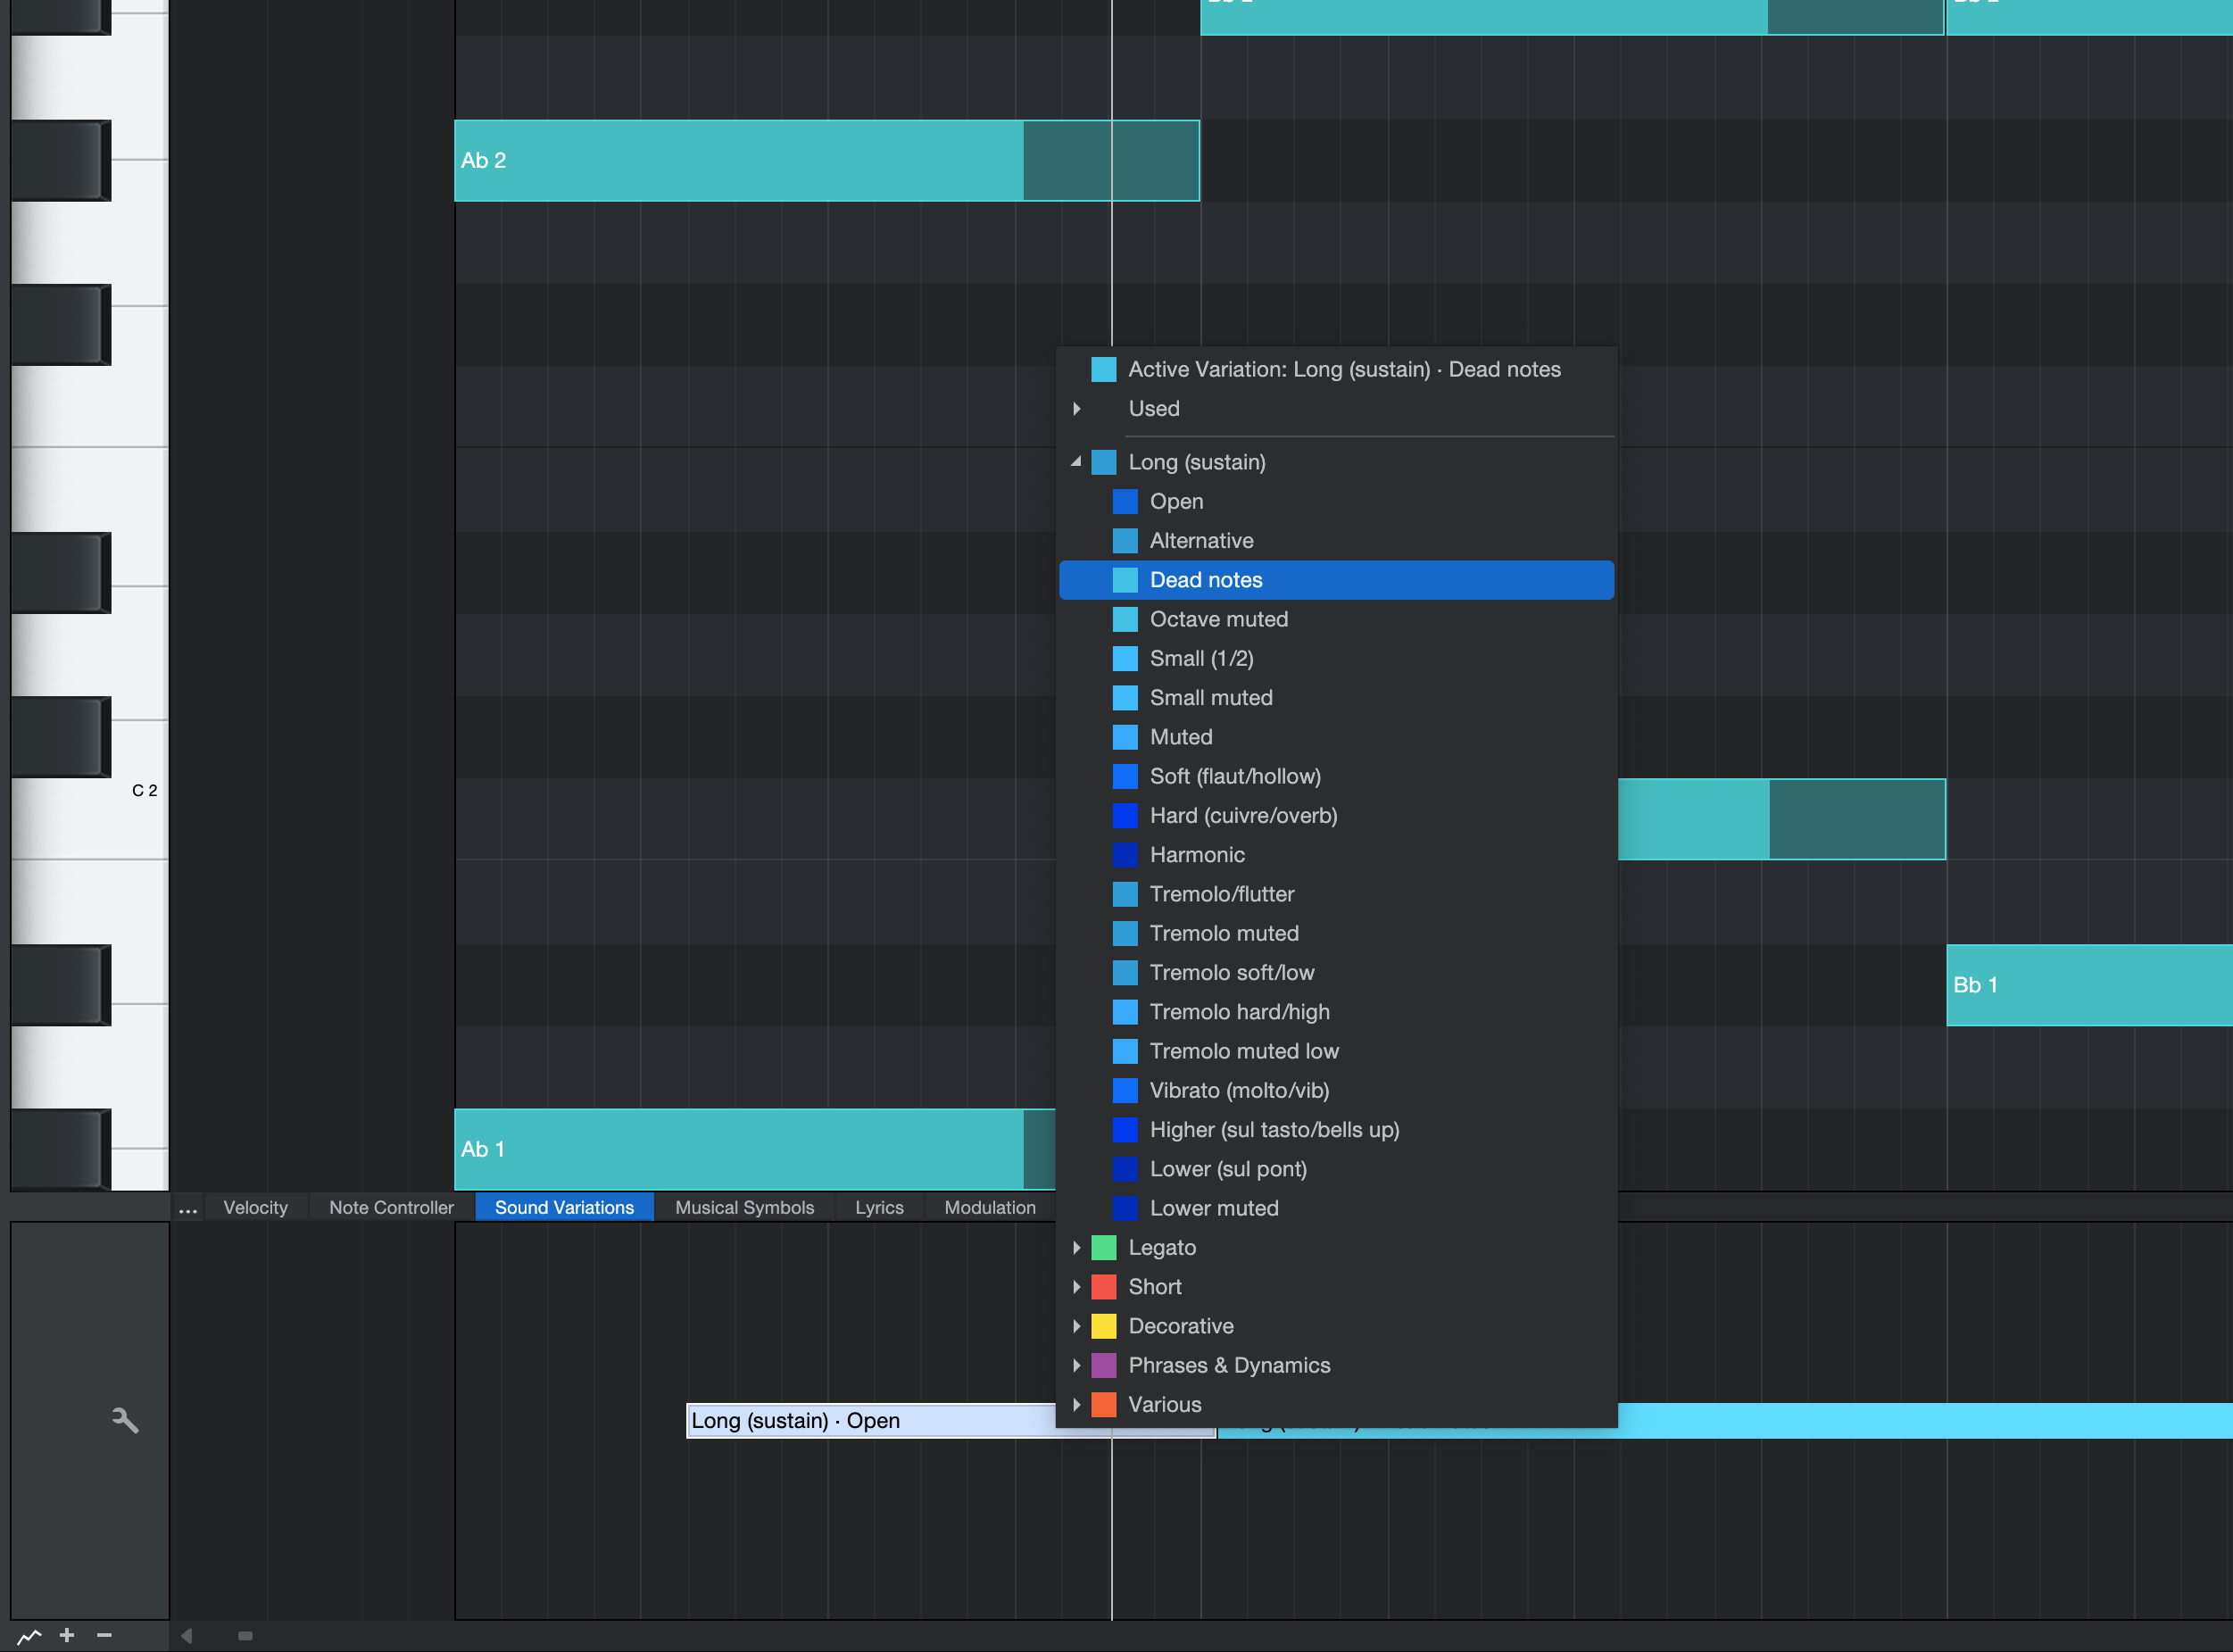
To view and edit Sound Variations in an Automation Lane, we’ll use the same “Nylon Guitar-Full” Track from the previous example.
-
Open the Note Editor [F2] if it’s not already open.
-
Click the Show/hide Automation Lanes button (), and then click the Sound Variation Parameter tab at the top of the lane. This tab is available in the Piano and Drum views, and will display below the Note Editor.
-
Using the Paint tool, [Left-Click] in the Automation Lane. You’ll be presented with a contextual menu of Sound Variations for the Nylon Guitar. Choose “Open.”
-
Repeat step 3 to the right of your last Sound Variation and select “Hammer-on.”
-
Press the spacebar or [Left-Click] the Play button to play your track. You should hear that any Notes played coincident with the “Open” Sound Variation will sound normal, while Notes played coincident with the “Hammer-On” Sound Variation will sound hammered-on.
You can also [Left-Click] and hold the mouse button in the Sound Variations lane to bring up the menu; then move your cursor to the desired Variation and release the mouse button to select.
Assigning Sound Variations using the Note Event Inspector
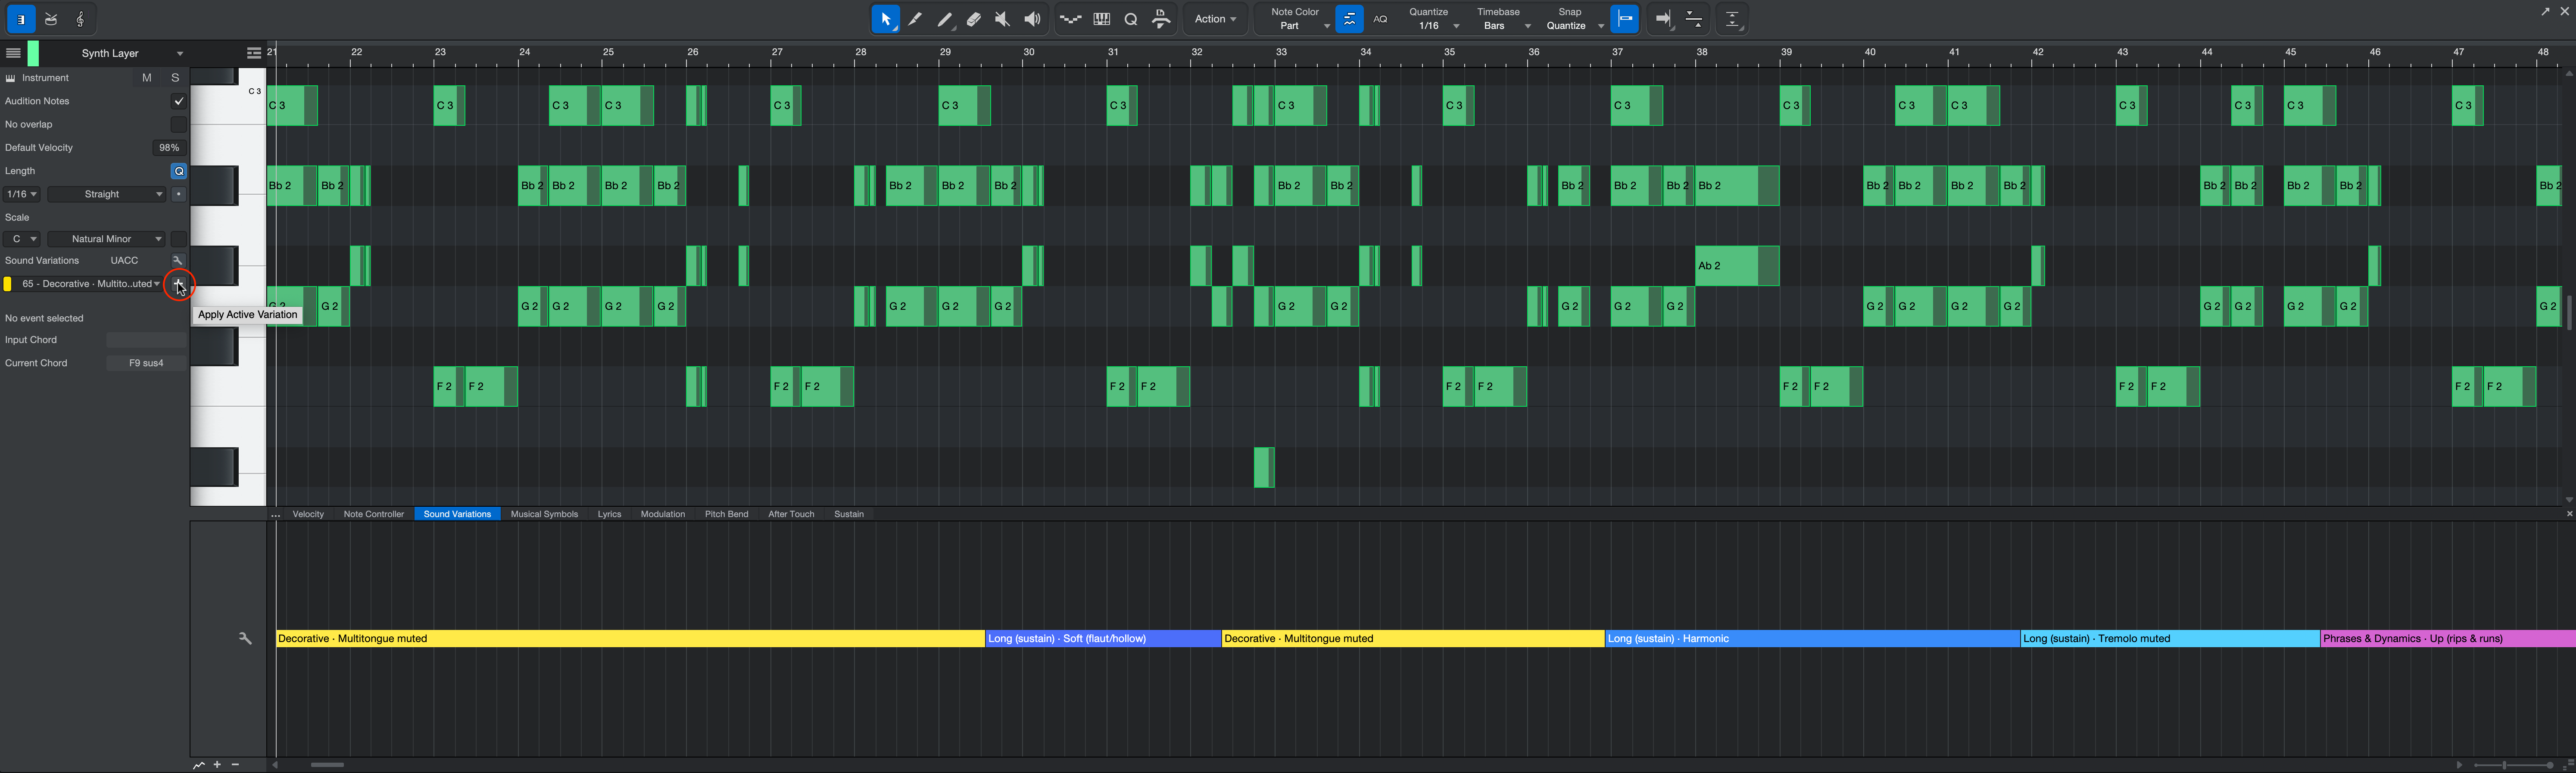
The Note Event Inspector, to the left of the Edit Window, allows you to apply the current Active Sound Variation to a group of notes with a single click. Simply use the Arrow tool to select a group of Note Events and click the [+] button in the Note Event Inspector to Apply Active Variation to the selected Note Events.
Clicking the [+] button with no notes selected will apply the Active Sound Variation at the current playback cursor position.
Power user tip: The “Apply Active Variation” command is an excellent candidate for your Macros, Keyboard shortcuts, or a trigger from Fender Studio Pro Remote!
Converting Key Switches to Sound Variations
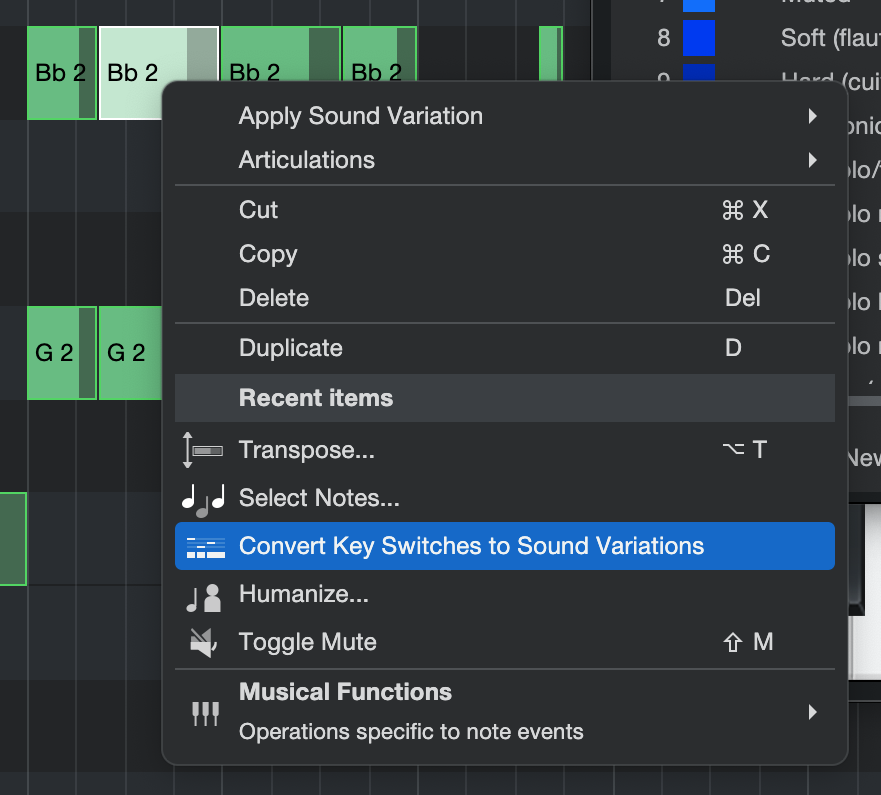
It’s easy to convert Key Switches to the Sound Variations format. Be sure to have your mapping set up in the Sound Variations Editor first, and have it set to “Use Activation Sequence.”
-
[Right-click] a Note Event in the Piano View.
-
Choose “Convert Key Switches to Sound Variations”
The notes will disappear from Piano View and reappear as Sound Variations in the Automation Lane. Just two clicks.
Select Part Automation with Notes

Although used in conjunction with Note Events, Sound Variations exist independently of Note Events—hence their home in the Automation Lane. If you would like to ensure that your Sound Variations stay connected to coincident Note Events when copying or moving notes, you simply need to enable "Select Part Automation with Notes” via the right-click contextual menu or this icon above the Edit Window:

Sound Variation entries in the Automation Lane remain in effect until another Sound Variation is entered; its colored bar stretches until the next Sound Variation Event.
To change a Sound Variation you have already placed:
-
Select the Sound Variation you want to change in the Automation Lane
-
[Left-Click] and hold to display a contextual pop-up menu.
-
Select the desired Sound Variation from the menu.
Sound Variations, Transposition, and Note FX
In order to avoid conflicts with musical actions (such as Transpose) or processing with Note FX or the Chord Track, Key Switches in the Note Editor are filtered and excluded from any type of playback processing. They also do not appear as notes in the Score Editor. Instruments that report their Sound Variations to Fender Studio Pro (such as Presence) display articulations with their names automatically.
For example, we’ll continue with “Nylon Guitar Full” from the Presence Core Library. Notice the highlighted key switches in Piano View. These keys will be unaffected if the Instrument Track is transposed, and they will not be triggered by Note FX such as an arpeggiator. This way you can re-use a particular guitar articulation in other locations—even when the guitar’s notes change to follow the Chord Track, for example.
The Sound Variations Editor
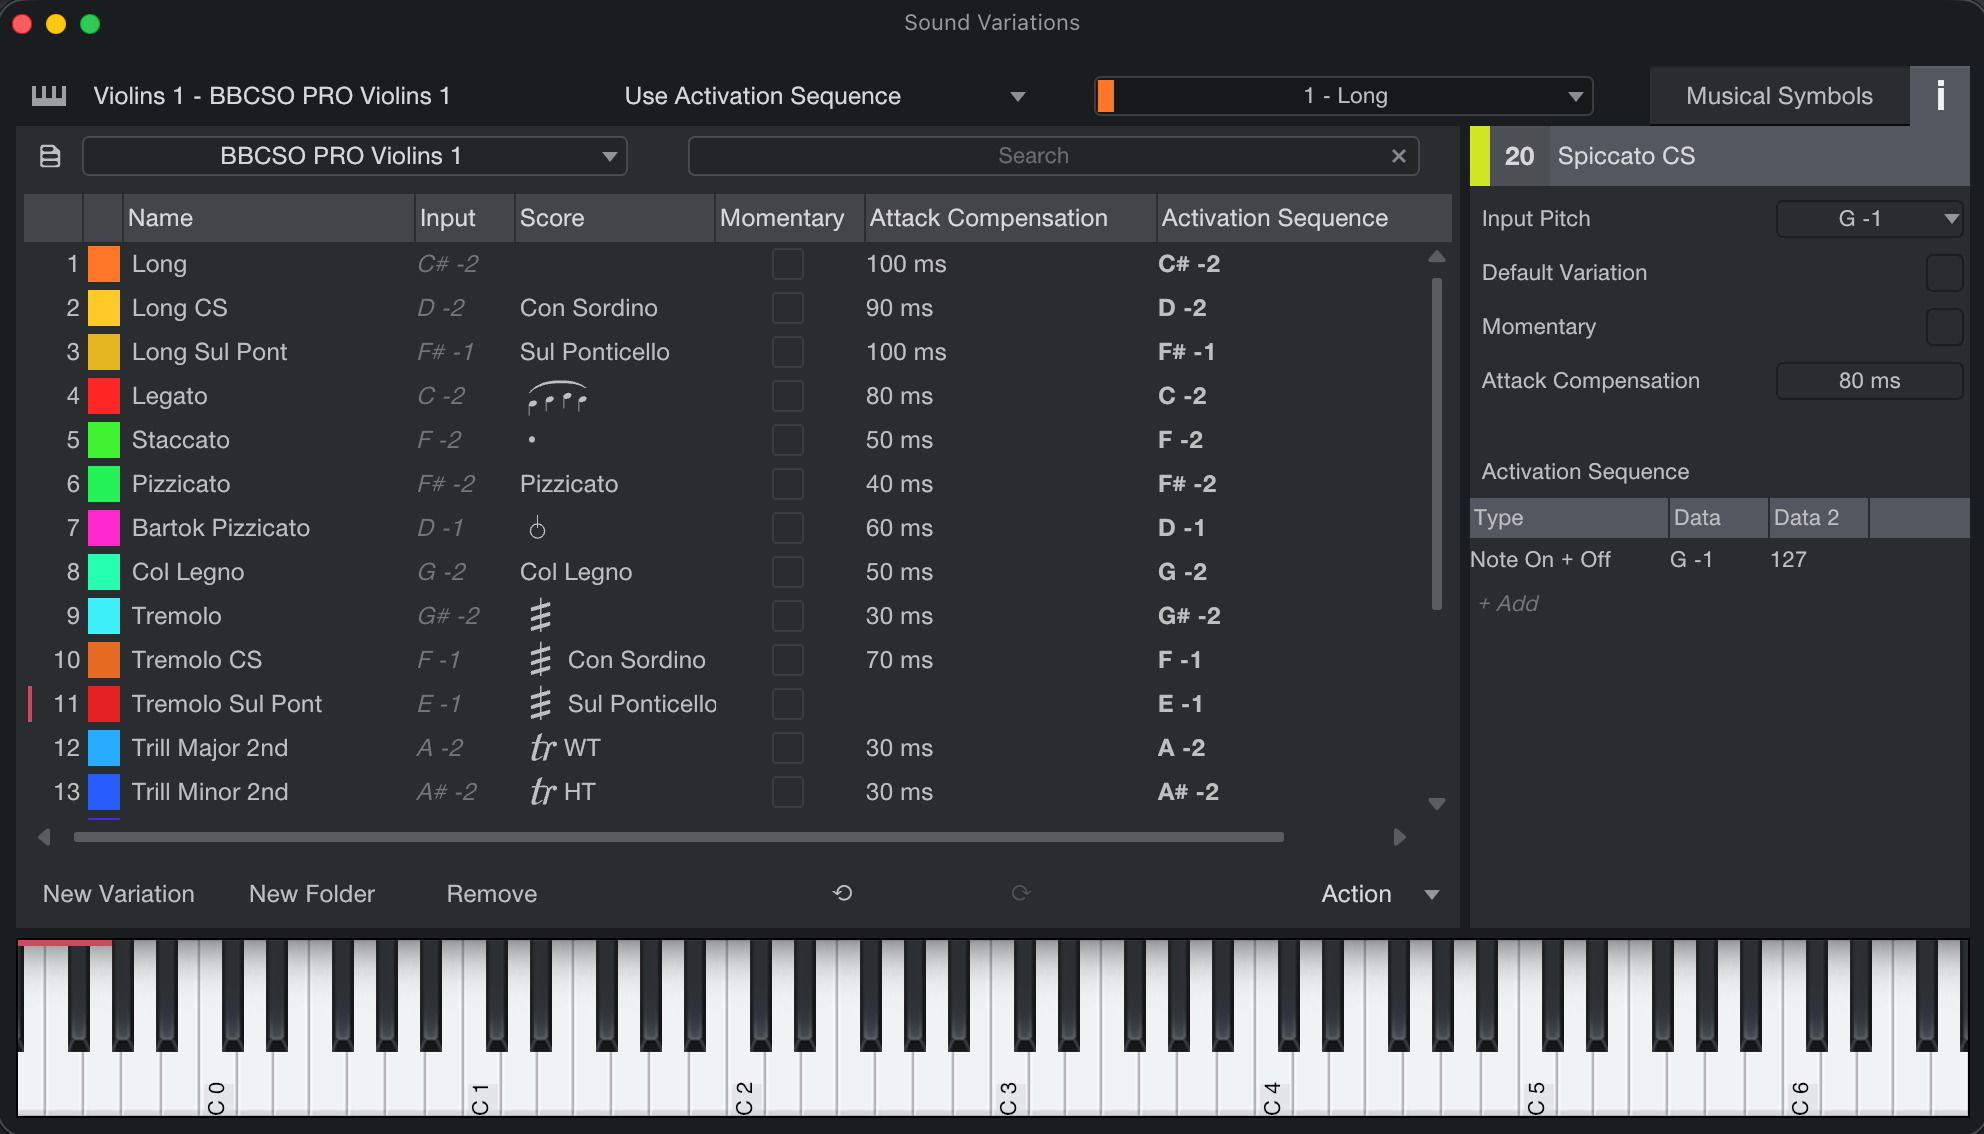
The Sound Variations Editor is your home for defining, mapping, and organizing your Sound Variations, as well as storing and recalling their presets. Using this interface, you’ll be able to import and create complex articulation controls suitable for use with robust orchestral virtual instruments.
It can be helpful to think of the Sound Variations Editor as an interpreter between your Session’s Note Events and the virtual instrument it is working with. The input it receives comes from note information or other control signals; the output it sends is passed on to the virtual instrument assigned to its respective Track.
Above, we see the Sound Variations Editor loaded with the aforementioned “Nylon Guitar-Full” Presence Preset. Let’s take a look at the options presented.
The Sound Variations List at the left of the interface displays all Sound Variations for the currently selected Track. Clicking on any of these to select them also sends an activation sequence command to the connected Virtual Instrument.
The Drop-Down menu at the top of the interface controls the Global settings for Sound Variations on the currently selected Track. Its options include:
-
Enable Key Switches: Choose this option to use the input Key Switches defined in the current map. Pitches tagged as Key Switches will ignore transposition and Note FX and Key Switch triggers will be sent to the Instrument.
-
Disable Key Switches: Use this option to deactivate any input Key Switch assignments and pass all notes to the instrument. A good choice for use with complex libraries that make use of multi-layered activation sequences that would consume too many keys if Key Switches were used. To enter or record a Sound Variation, commands on a hardware controller or Fender Studio Pro Remote can still be used.
-
Use Activation Sequence: Use this option to directly control the instrument from your hardware controller using the Activation Sequences created in the Editor. In other words: Input from controller=Output to virtual instrument. All notes that are on Key Switch pitches are sent to the instrument. This is an ideal choice for users who have developed a proven articulation layout that they would rather not re-map from scratch. More on building this mapping follows shortly.
Note that if you have a Key Switch programmed in the Note Editor AND a Sound Variation programmed in the Automation Lane simultaneously, the articulation that will be prioritized and heard is determined by these settings.
The Options menu above the keyboard interface and below the Sound Variations list contains the following options:
- New Variation: Use this to create a new Sound Variation. If the instrument supports custom Key Switch querying, all sound variations will be mapped automatically. When this is the case, “New Variation” will be disabled—the Sound Variations are already assigned!
- New Folder: Use this to create a new Folder for your Sound Variations to organize and keep things tidy.
- Remove: Use this to remove the currently-selected Sound Variation or Folder. Removing a Folder will not delete its contents. If the instrument supports custom Key Switch querying, this option will be disabled.
Undo/Redo Icons: Use these to Undo/Redo tasks performed in the Sound Variations Editor; these tasks are not affected by Fender Studio Pro’s main Undo/Redo functionality.
The Action menu on the bottom right of the Sound Variations list contains various Actions to help you quickly create and map your Sound Variations:
-
Reload Map from Instrument: Use this option to reset your Sound Variations map to the default settings as determined by the current Instrument. This option is only available with Fender Studio Pro’s included instruments and third-party VST instruments support Fender Studio Pro’s Dynamic Mapping.
-
Assign Default Key Switches: Use this option to set the input Key Switches to match the output Key Switches. Useful for maps with basic single-key Key Switch mappings; particularly if your Key Switch mapping has gotten mixed up somehow and just needs a clean slate. While similar to the “Use Activation Sequence” Option in the Sound Variations Editor’s drop-down menu, this offers the advantage of displaying colored Key Switches in the Arrangement View and Note Editor.
It's similar to setting the Sound Variations Editor to "Use Activation Sequence," but has the advantage of showing the marked keys with colors. Also, it could be used as a starting point if you would ever want to start over with a custom (re)mapping.
This option is only available with Fender Studio Pro’s included instruments and third-party VST instruments that support Fender Studio Pro’s Dynamic Mapping (more info on Dynamic Mapping farther below).
-
Assign Key Switches Chromatic: Use this option to assign Key Switch Note values ascending chromatically. Choose from a list of four value ranges starting at C -2.
-
Assign Key Switches White Keys: Use this option to assign Key Switch Note values ascending value using only the white keys. Choose from a list of four value ranges starting at C -2.
-
Shift Key Switches: Use this option to nudge all of your Key Switches note values en masse, either by ±1 octave or ±1 note.
-
Clear All Key Switches: Use this option to remove all Key Switch note values from the Input column in the Sound Variations list as well as from the Note Editor.
Musical Symbols and the Inspector
Clicking on the “Musical Symbols” button or the “I” icon on the top right of the interface will toggle visibility of the symbols view and the Variation Inspector on the right side of the Sound Variations Editor.
The Inspector contains the following options. Changes to each of these will edit the currently-selected Sound. Note that many of these options can also be edited directly from the Sound Variation List on the left of the Editor.
-
Color: Select the desired color of the Sound Variation by [Left-clicking] on the colored rectangle.
-
Name: Enter the desired name of the Sound Variation by [Left-clicking] on the text box and typing.
-
Input (Pitch): determines the input used to trigger Sound Variations. Select the Note value assigned to this Variation for use with Key Switches. Notes of this value will behave as Key Switches in Fender Studio Pro’s Note Editor when the Global (drop-down menu) option is set to Enable Key Switches.
-
Score: Here, you can assign Musical Symbols to trigger your Sound Variation.
-
Default Score Variation: This item denotes that the selected Sound Variations will be used when no Sound Variation is explicitly applied to Note Events.
-
Momentary: This checkbox controls if the instrument will return to the previous Sound Variation after the Note Off for this Sound Variation change has been received. When checked, the instrument switches back to the Variation which was active before when the momentary variation terminates. When unchecked, an articulation will continue to be in effect until a new Key Switch event is processed.
-
Attack Compensation: In this column, you can apply a millisecond offset to articulations with an inherently slow attack, such as legato or soft patches, ensuring they land precisely on the beat.
-
Note: After adding an offset value, events can then be quantized to the grid while simultaneously preserving both natural timing feel and correct score presentation. Attack Compensation values are stored directly within Sound Variation maps, keeping everything neatly in one place.
-
The Musical Symbols tab allows you to assign dynamic markings to Sound Variations so that these can trigger MIDI velocity changes.
-
Dynamics: Click in this column to choose the desired Marking you would like to use to trigger a MIDI velocity change, from pppp to ffff.
-
Parameter: Use this column to choose the desired MIDI velocity value assigned per Dynamic Marking. Default values are distributed from 13-127.
-
Process Dynamics: When ticked, Fender Studio Pro will use Dynamics Markings to trigger MIDI Velocity changes in Note Events.
The Action Menu
Located at the bottom right of the Musical Symbols interface, the Action drop-down menu presents several useful options:
-
Load Default: Choose this item to load the default Musical Symbol and Dynamics maps.
-
Store as Default: Choose this item to store all current Music Symbol and Dynamics maps as default. Default settings are saved on a per-instrument basis.
-
Copy From: Choose this item to quickly copy all Score Variation settings from another instrument. This option only appears when the Dynamics map is empty.
-
Auto Assign: Symbol Map Choose this item to automatically assign Symbols to the most appropriate Sound Variations based on the names of the Sound Variations.
-
Clear: Map Choose this item to empty all Score Setup options. Useful for starting over from a clean slate.
Adding Musical Symbols to Sound Variations
A musical symbol or combination of symbols added to the Score View or the Musical Symbols lane in the Note Editor can trigger a Sound Variation. In the Sound Variations Setup window, click anywhere in the Score column of the list view. Select one or more symbols to assign to a particular Variation. Multiple symbols can be assigned in the Sound Variations music symbols column at one time – you can even add alternative symbols for the same variation by clicking the “+” button at the top of the Symbols picker.
Using combinations of articulations and direction symbols makes for a very powerful workflow. For example, you can add a single variation that requires a staccato with con sord and sul ponticello – once the 3 conditions are met in either the Music Symbols lane or Score View, the variation is triggered. The “normale” music symbol allows a condition to be cancelled. For example, you could use “normale” to cancel “sul ponticello” whilst keeping “con sord” active, which would then trigger a different Sound Variation.
Applying Musical Symbols and Dynamics Markings
When composing or editing your music, these Dynamics Markings and Musical Symbols can be applied in two different ways:
-
Via the Note Editor Inspector of the Score View
-
Via the Musical Symbols lane in the Note Editor
Applying a Dynamics Marking or Musical Symbol via either of the above methods will cause it to be visible in both Score View and Note Editor. Once set up and linked to your Sound Variations, applying them during composition is fast and intuitive. Visit Score View to learn more.
At higher Zoom levels, Musical Symbols will be rendered directly on Note Events for easy reading.
Also keep in mind that Musical Symbols will out-prioritize Sound Variations for processing in the event of a conflict where one of each is placed in the same position in their respective lanes.
The Musical Symbols Lane
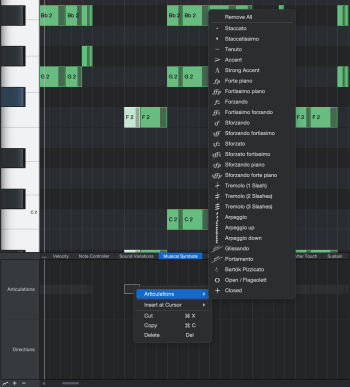
The Musical Symbols Lane can be used to apply both Articulations and Directions to your Note Events.
Articulations: Using the Arrow tool, [left-click] in the Articulations lane to select all of its coincident Note Events. Click again to bring up a list of articulation options to apply to these notes. Click a third time to choose the Articulation from this list that you would like to apply to these notes.
You can apply multiple articulations simultaneously.
Directions: Using the Paint tool, [left-click] anywhere in the Musical Symbols lane to be presented with a list of Directions. Much like Musical Symbols, pick the one that you’d like to use with another left click.
Alternatively, you can [right-click] in the Musical Symbols Lane and choose “insert at cursor” to apply a Direction at the cursor point.
Note that, generally speaking, Articulations are intended for use as temporary, expressive changes in performance technique like a tremolo or glissando. Directions are typically less momentary in nature, like a pianissimo directing a performer to play quietly over several bars.
-
Articulations = note-based
-
Directions = range-based
Activation Sequences Unpacked
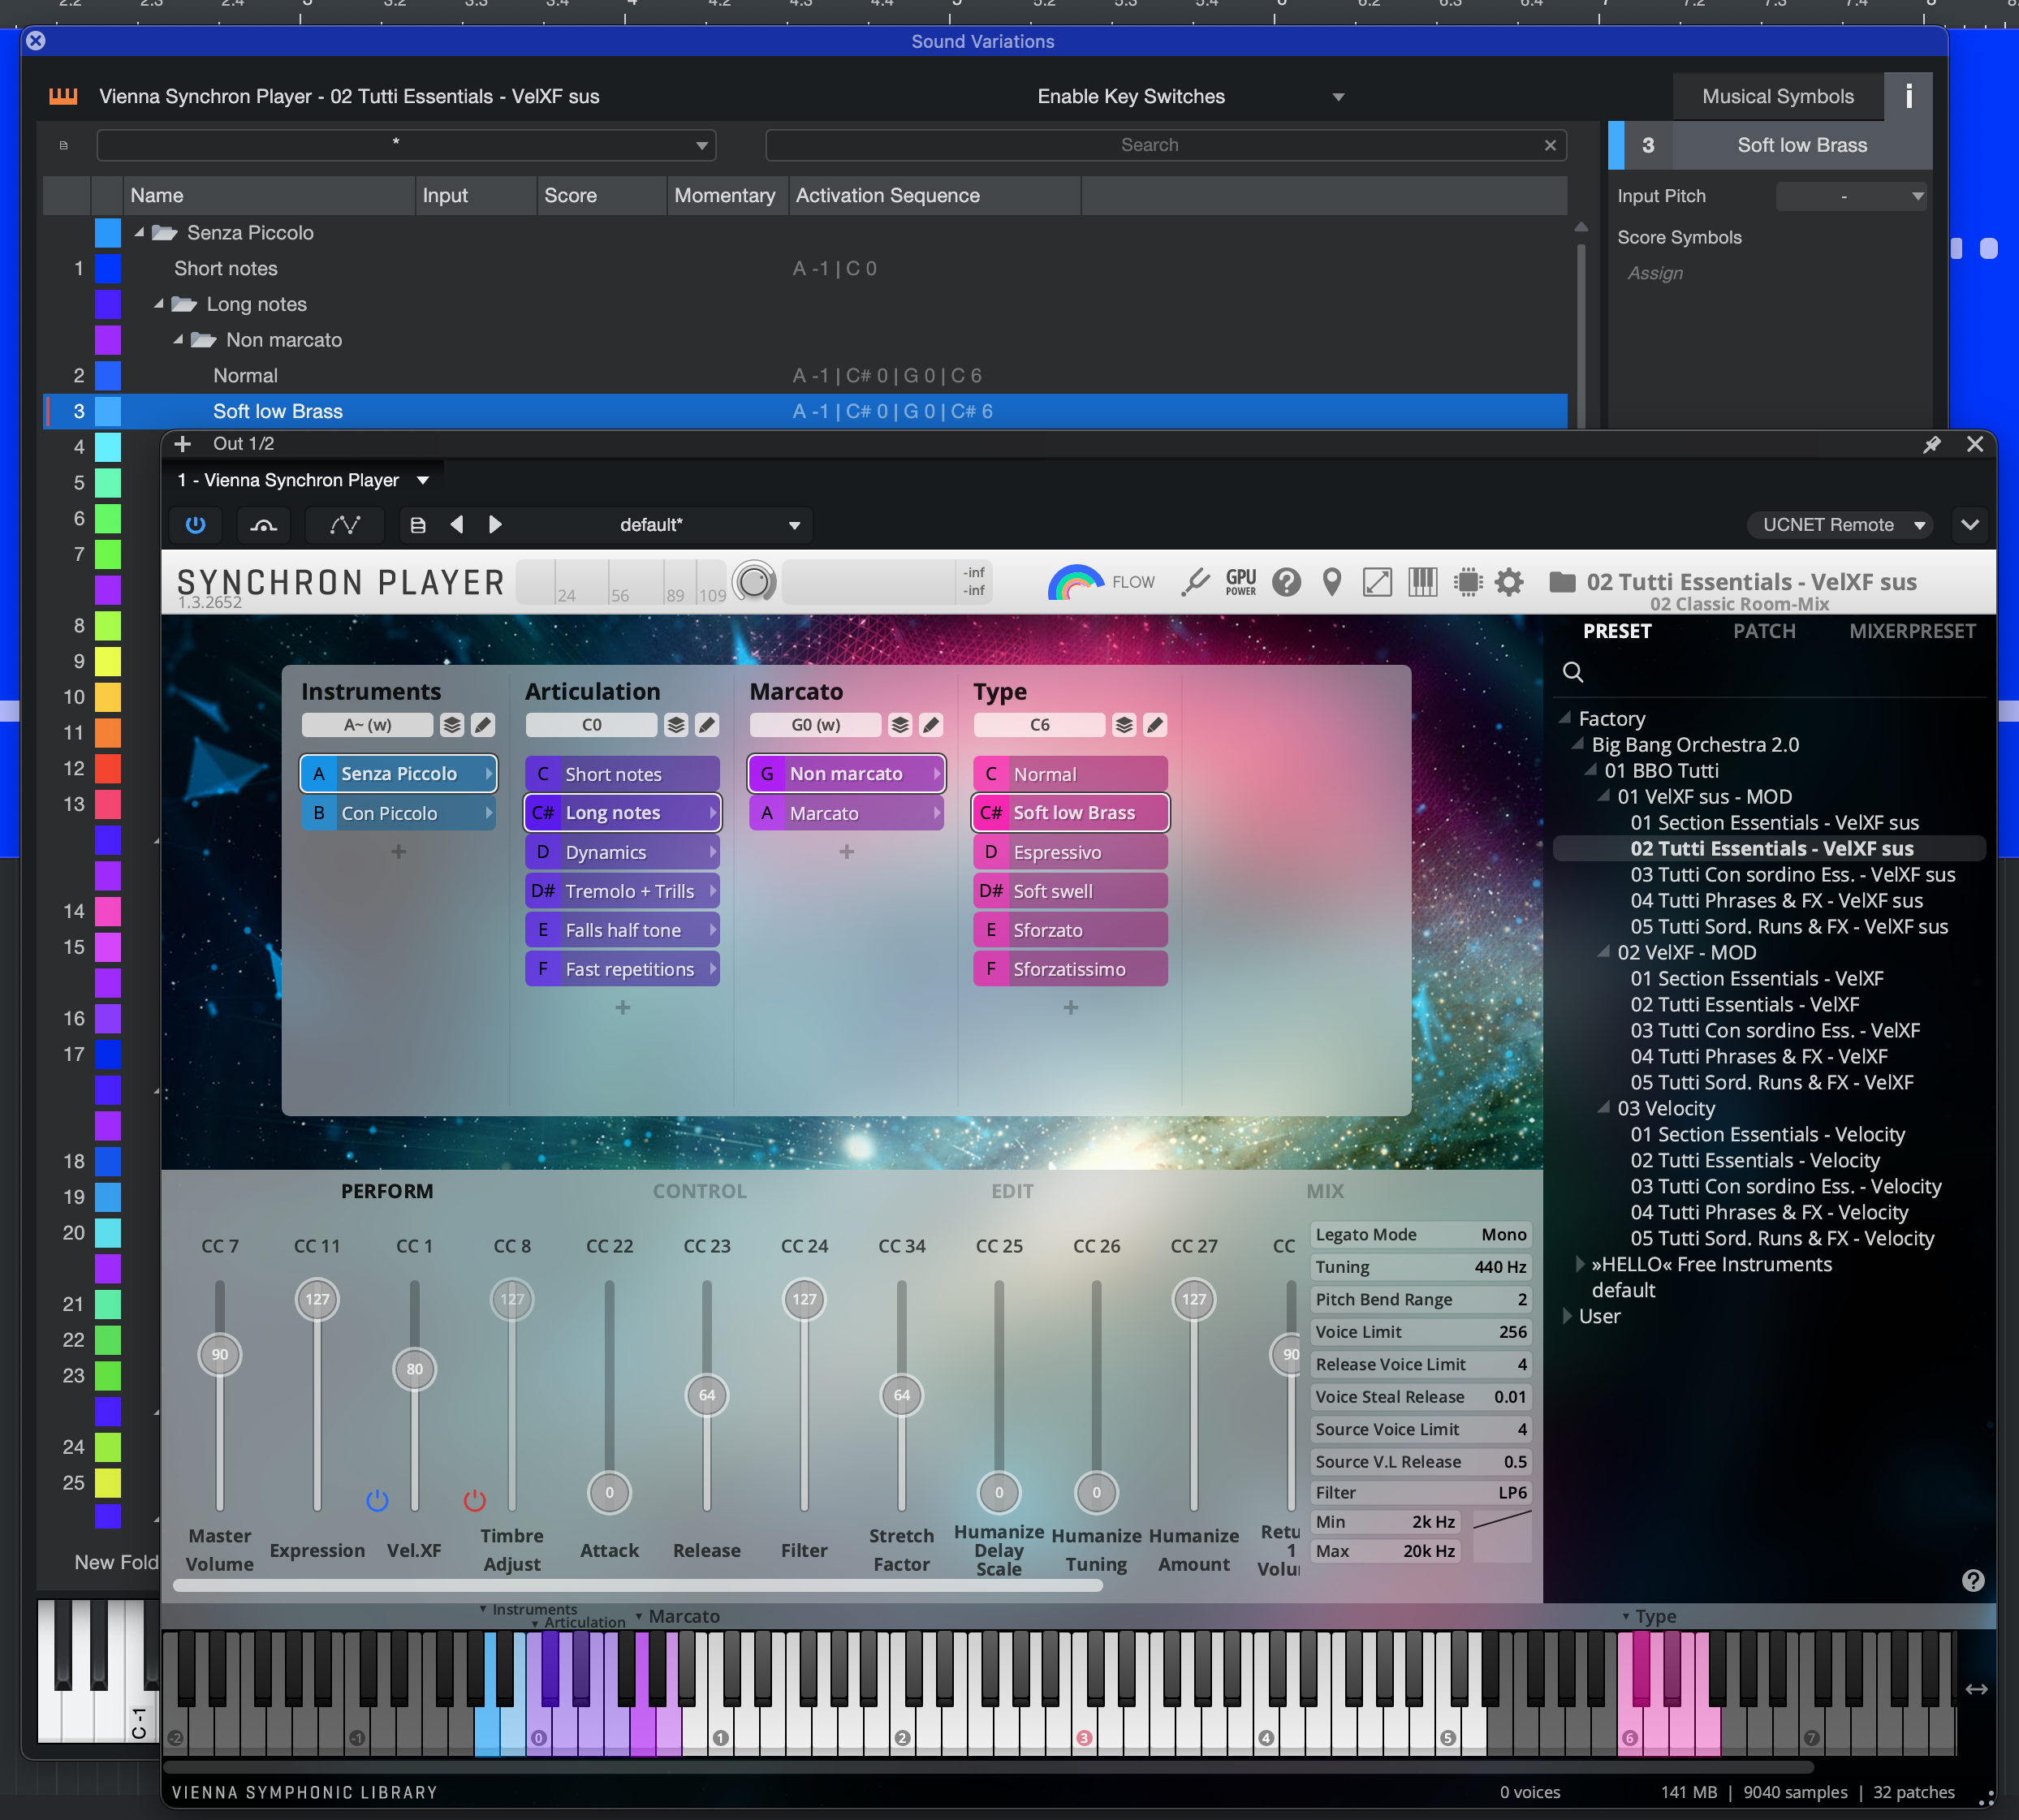
Let’s take a look at an example Activation Sequence using Vienna Symphonic Library’s Big Bang Orchestra. In order to trigger the Sound Variation “Soft low Brass,” several keystrokes must be entered on a MIDI controller in sequence.
The sequence is:
A -1 | C# 0 | G 0 | C6
... all using Note On + Off input event types.
As we can see from the Vienna Symphonic Orchestra interface, each of these commands in sequence is effectively stepping us through categories and sub-categories of articulations:
-
Instruments (Senza Piccolo and Con Piccolo variations )
-
Articulation (Long Notes and Short Notes variations)
-
Marcato (Marcato and Non-Marcato variations)
-
Type (Various articulations)
-
-
-
This is comparable to navigating deeper into a filing structure on your computer to search for the file you want. In fact, if you were to collapse several of the folders that organize the default Sound Variations for Big Bang Orchestra, you will find a literal folder structure:
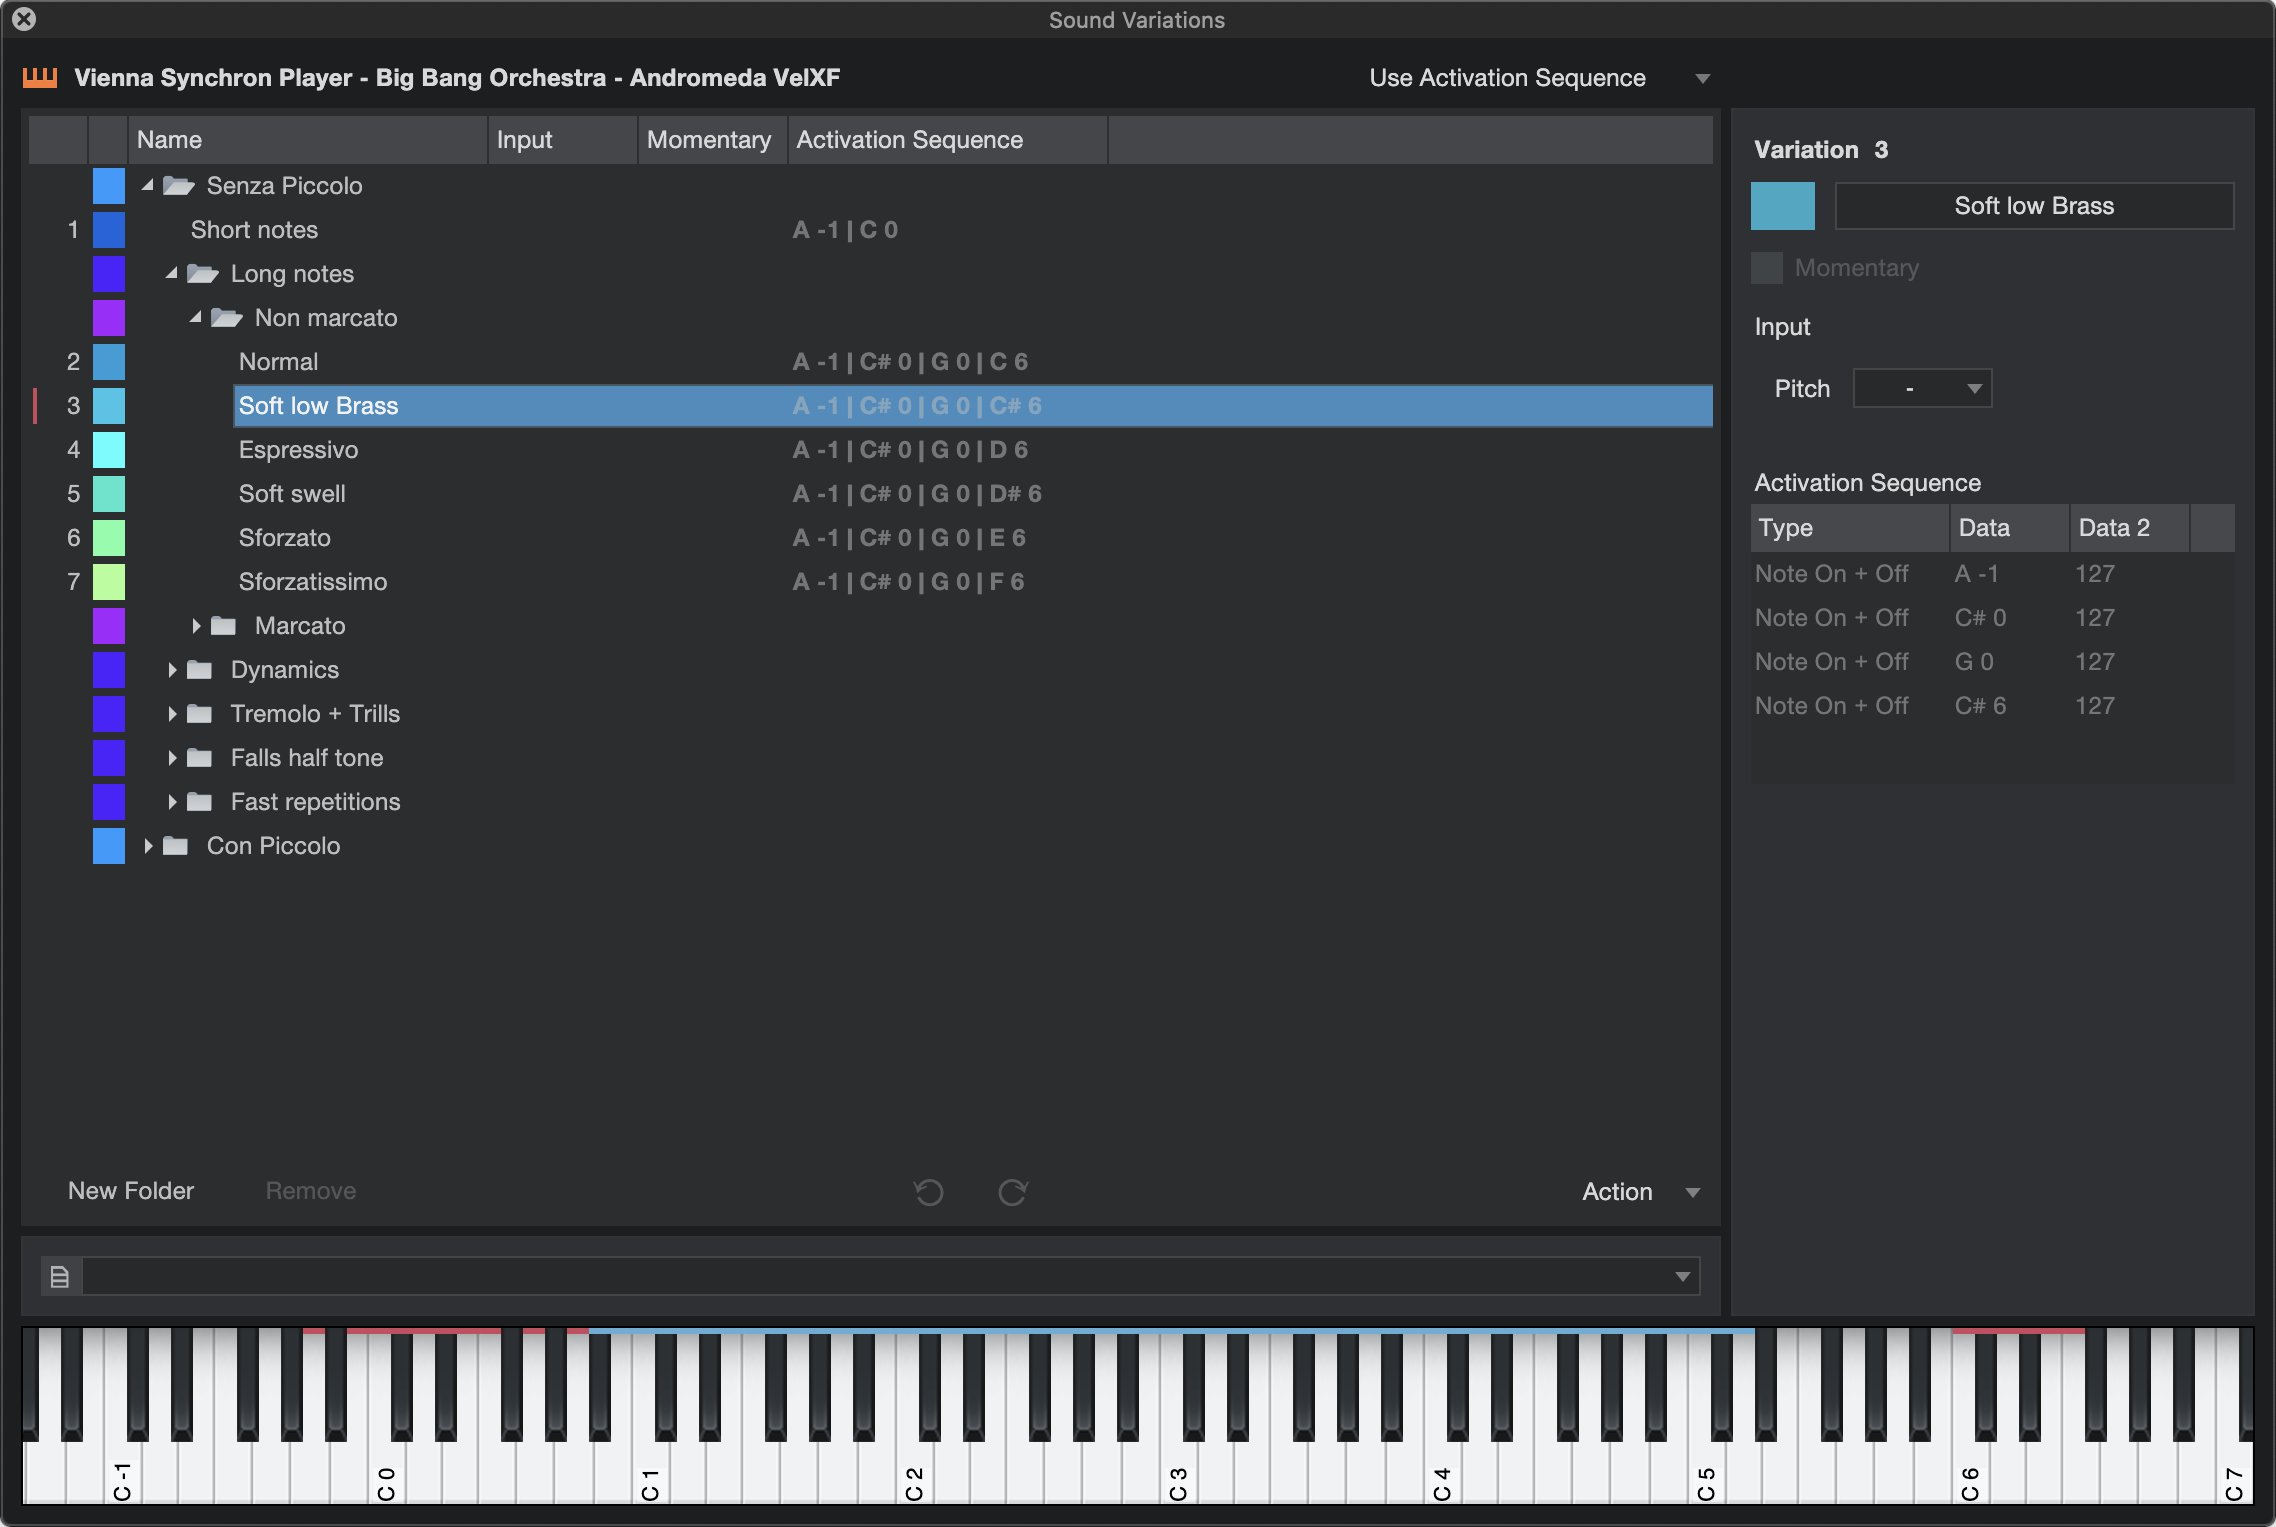
Note that this structure is also reflected in the right-click contextual menu when “Apply Sound Variation” is applied to a Note Event:
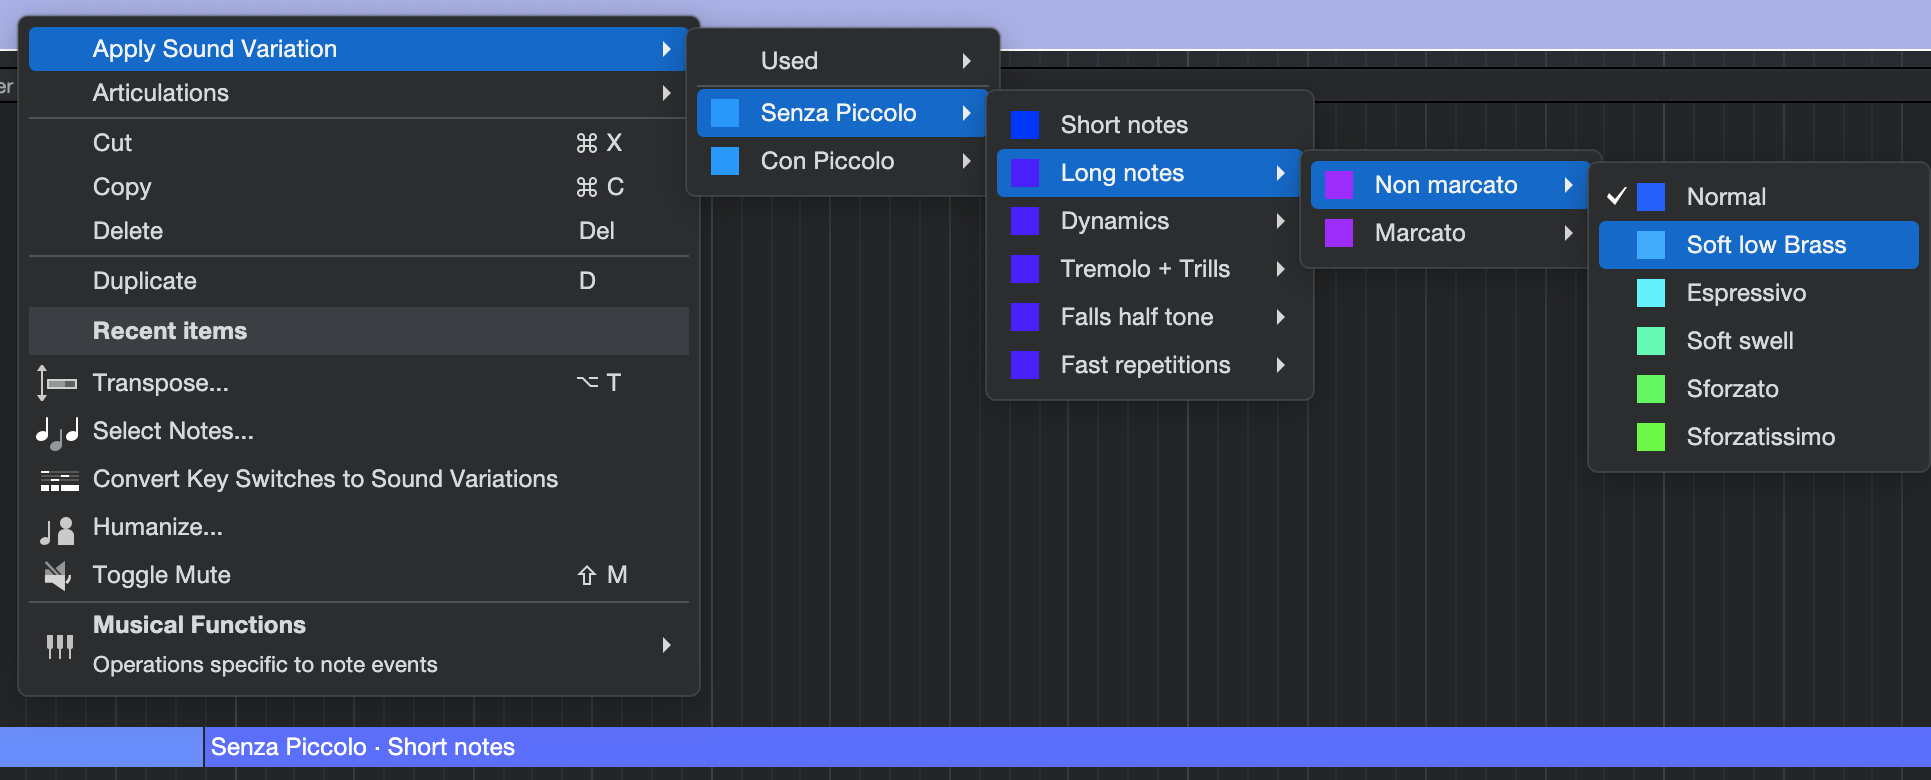
With this configuration, each MIDI keystroke in the Activation Sequence steps through this hierarchy to get you one step closer to the articulation that you’re looking for. Of course, if you’re producing, you can use “Apply Sound Variations” via the right-click contextual menu; using Activation Sequences directly from your MIDI keyboard is well-suited to real-time performances.
Dynamic Mapping
Complex instruments require sophisticated mapping of Sound Variations that can be very time-consuming to create. Fortunately for you, we’ve partnered with some of the best orchestral library developers in the world, and given them the tools they need to expose their current mapping to Fender Studio Pro—so manual mapping is no longer needed! So, when you load a preset from a qualifying instrument that supports Dynamic Mapping into a Fender Studio Pro Session, the available articulations and their activation sequence is automatically imported into the Sound Variations editor.
Here’s an example of a fully-mapped Sound Variation from Vienna Symphonic Library. It’s too big to even fit in the Editor!
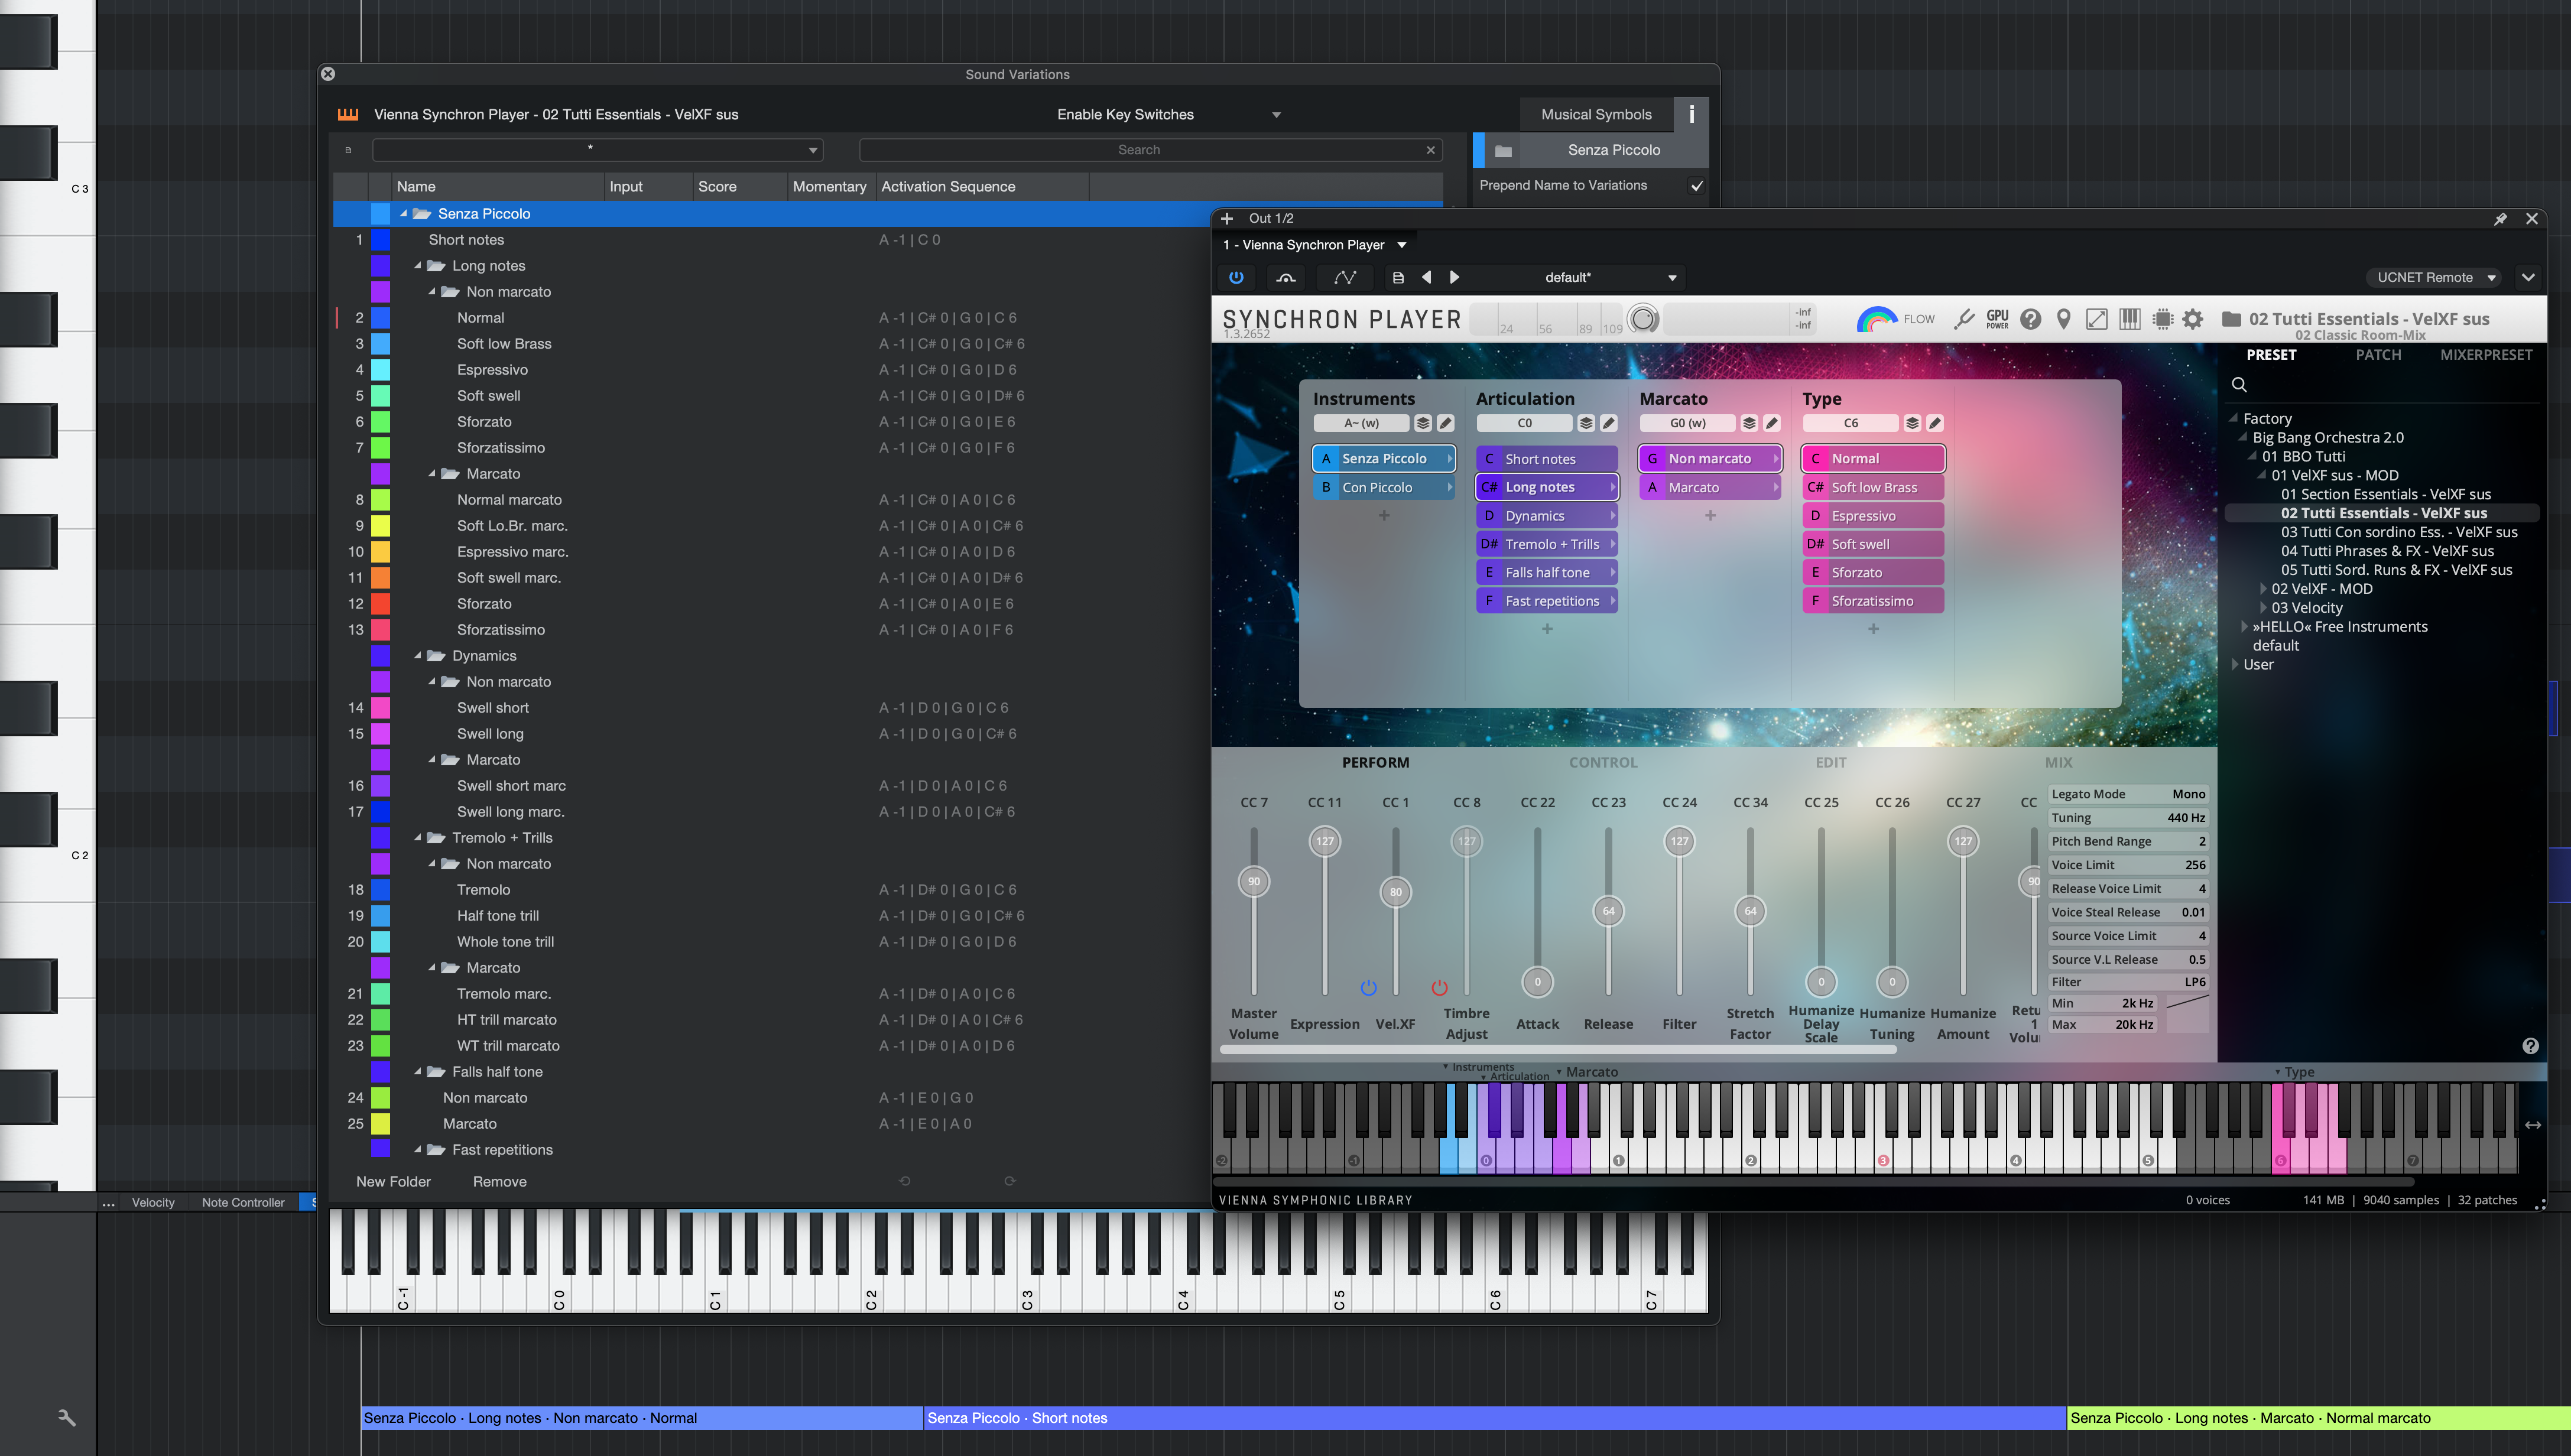
Note that any instrument using Dynamic Mapping, including Fender Studio Pro’s own instruments like Presence, has its Activation Sequences mapped and locked to the instrument. You cannot change these Activation Sequences, but you can trigger them from Key Switches, commands, keyboard shortcuts, macros, or remote controllers—including Fender Studio Pro Remote.
Beyond the Keyboard: Alternative Activation Sequence Triggers
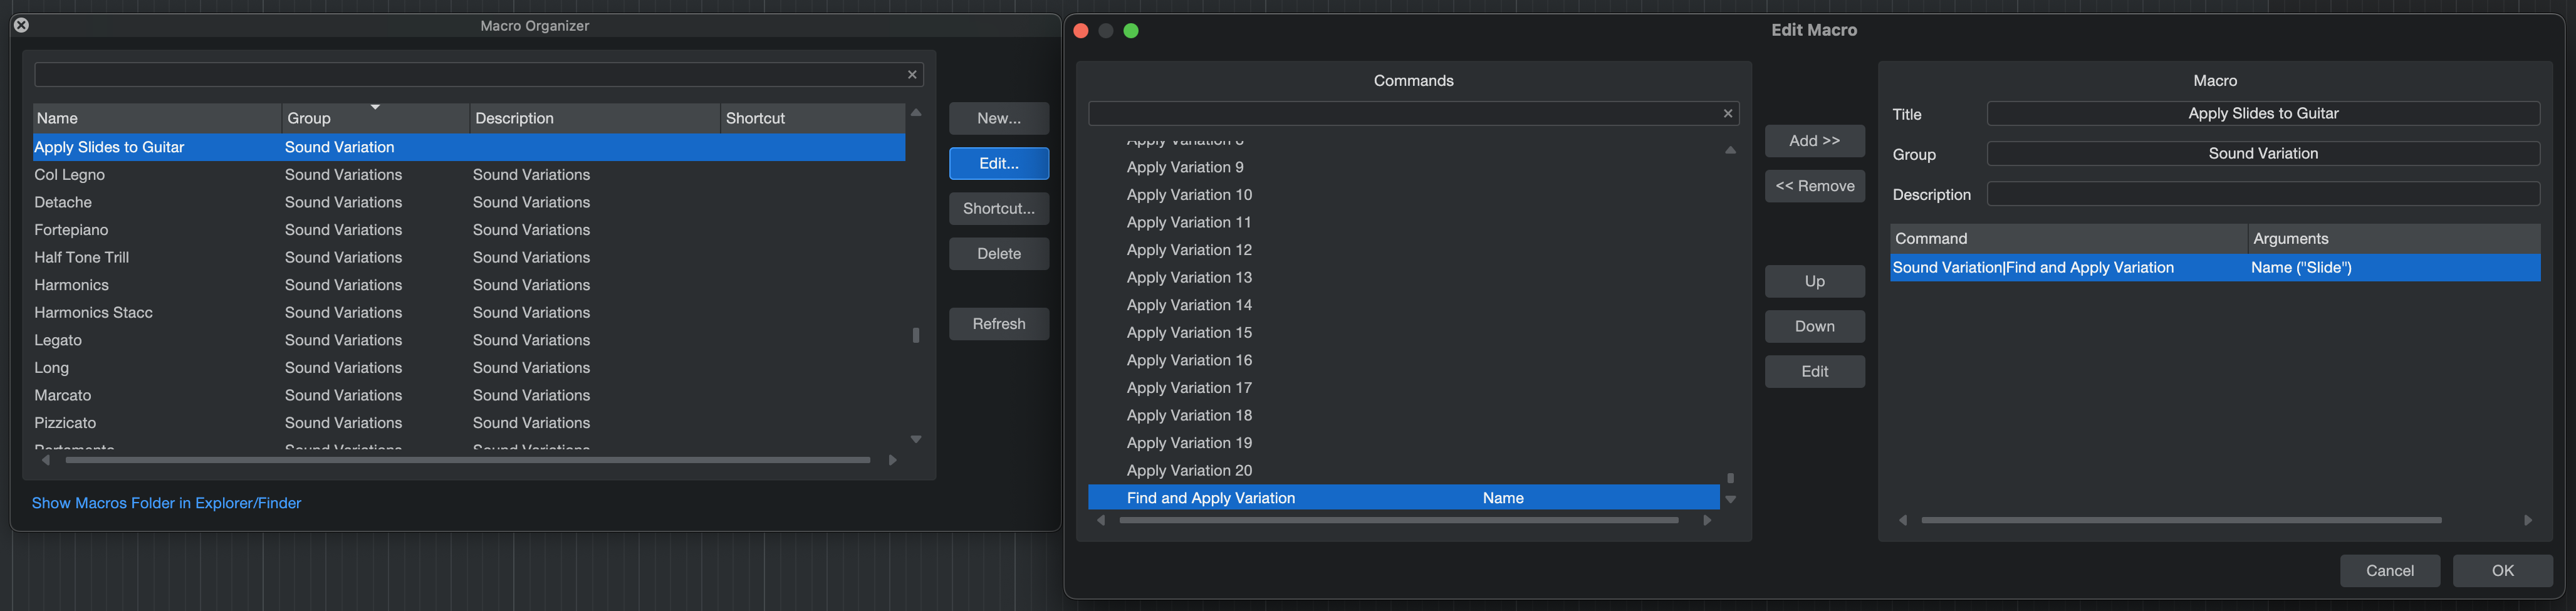
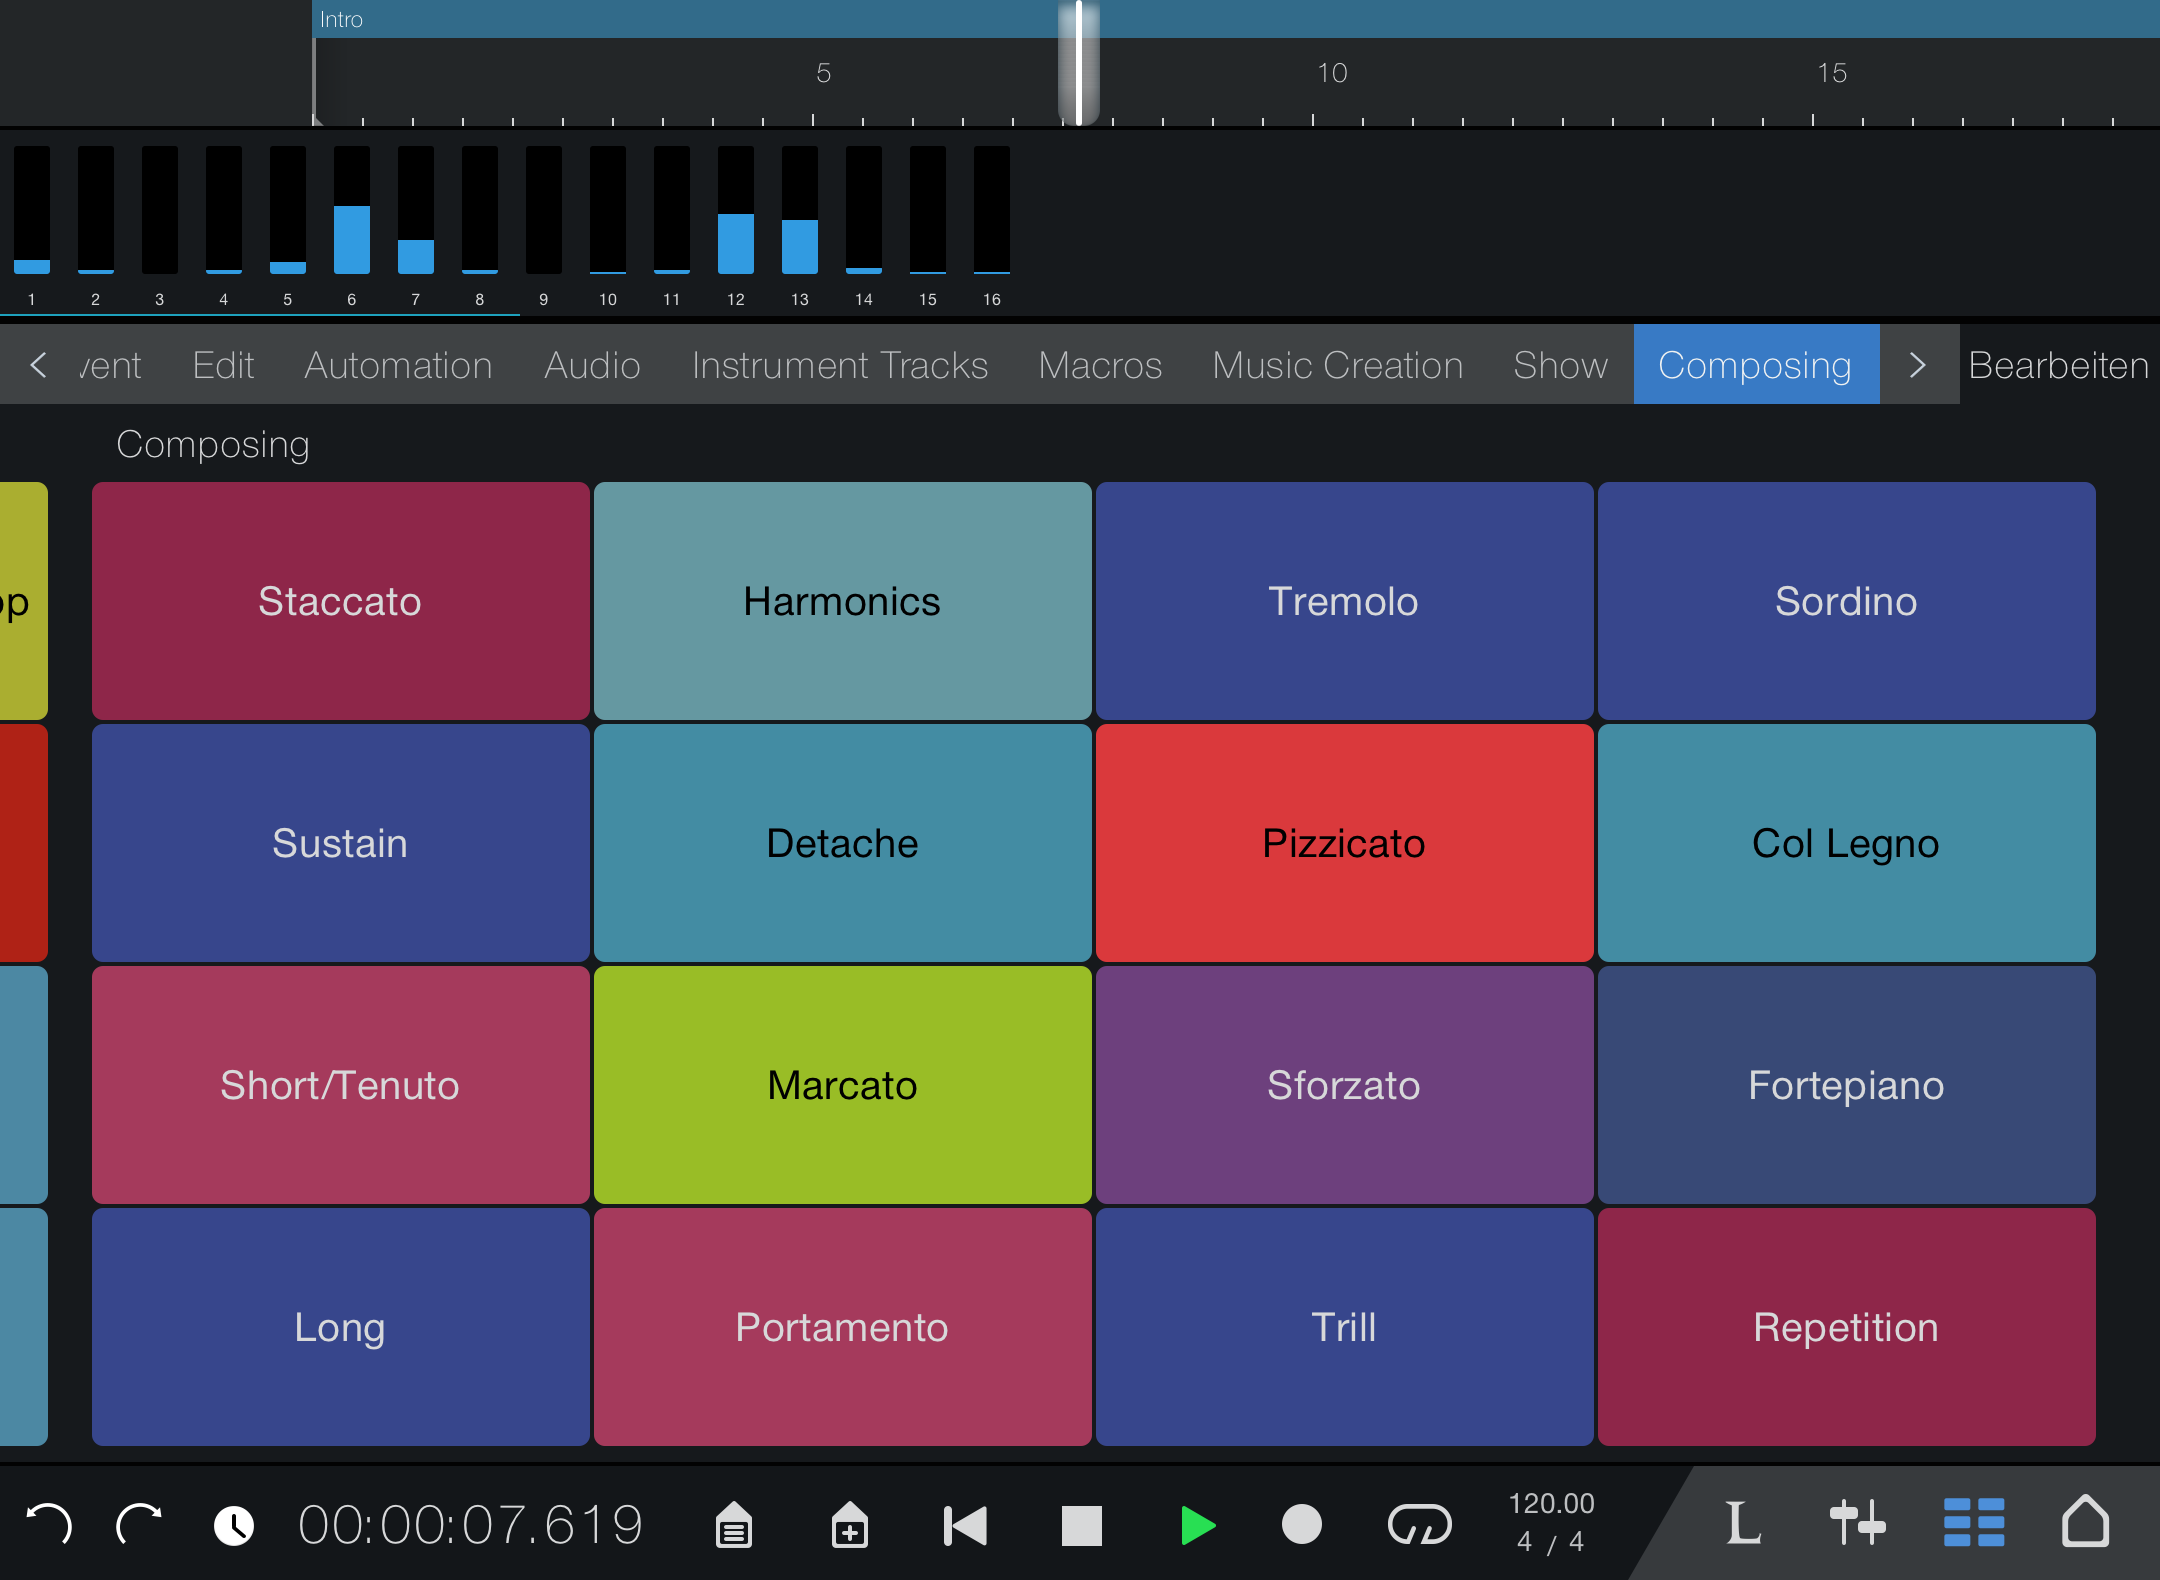
Fender Studio Pro provides 20 Sound Variation slots that can be accessed from outside the Articulation Lane or Note Editor. You may also employ the Find and Apply Variation command, which will cause Fender Studio Pro to look up a Variations by name and apply it to your Note Events.
With these, you’re able to trigger Sound Variations from a number of different sources, including:
-
Keyboard shortcuts: To assign a Sound Variation trigger to a Keyboard Shortcut, visit the Keyboard Shortcuts panel and search for “Variation.” There, you’ll find slots with which to fill with your desired Keyboard Shortcut triggers and assign them to the keys of your choice.
-
Macro: To assign a Sound Variation to a Macro, use the Macro Editor. In the Macro Editor, you’ll find the Variation slots previously mentioned, including Find and Apply Variation.
-
Remote Controller: To assign a Sound Variation to an external controller like a MIDI keyboard, first open the Console’s [F3] External Devices menu. For your desired MIDI controller, click Edit. In the following interface, [right-click] on the button, fader, or knob you would like to use to trigger a Sound Variation, and choose “Assign Command.” From the contextual menu that appears, choose the Sound Variation slot you would like to trigger from that control.
-
Studio Pro Remote: You can use Studio Pro Remote to trigger Sound Variations via the Macros described above. Visit Studio Pro Remote’s Macro View and tap the Edit button. A new gray button will appear. Click the + sign on it, search the context menu for Sound Variations category, and pick the Variation trigger you would like to assign. This is another great use case for “Find and Apply Variation,” as well.