Note Editor Inspector (Score View)
The Note Editor Inspector on the left side of the window offers some unique features in the Score view. It is divided into two areas, with Track settings in the top half and three selectable panels in the lower half.
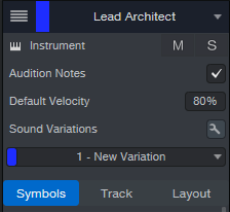
The following settings are located at the top of the Note Editor Inspector. They are available regardless of which panel is selected (Symbols, Track, or Layout).
- Track List: Click this button to open a list of all of the Instrument Tracks in the Session. You can show or hide the staves of each Track in the Full Score View using the Show/Hide buttons to the left of the Track name. It is possible to click-and-drag through many buttons and add their Tracks to the Score view very quickly. Click the Lock Track List icon to preserve the Score view Track selection even if you switch to another Track in the Arrange view.
- Track Selector: To view only one staff and close the others, click the Track name at the top of the Note Editor Inspector and select the desired Track.
- Instrument: Click the keyboard icon to open the Instrument Editor for the selected Track.
- Mute/Solo: These buttons affect the Console Channel and the Track.
- Audition Notes: Engage this option to hear notes when they are selected with the mouse. To hear a chord, click anywhere on the stem of the chord.
- Default Velocity: This is the value used when adding notes to the Score with the Paint tool. Dynamic markings that you add affect the playback velocity, but those changes are made "behind the scenes"; they are not visible in Piano or Drum views.
-
Sound Variations: Clicking this will open the Sound Variations window. For more information, see “Sound Variations in the Score Editor.”
Symbols Panel
The buttons in this window are used to select dynamic markings and performance articulations and add them to the Score. As with the Default Velocity setting, these markings affect the playback of the Track, but the changes are made "behind the scenes"; they are not visible in Piano or Drum views.
Many of the buttons have arrows that appear in their bottom corners as the cursor hovers over them. These indicate the presence of pull-down menus that allow you to specify the impact or behavior of the selected icon when it is applied to the Score. You can right click the icon to view its options, or for a quicker selection, left click and hold on the icon until the menu appears, then drag and release over the desired option.
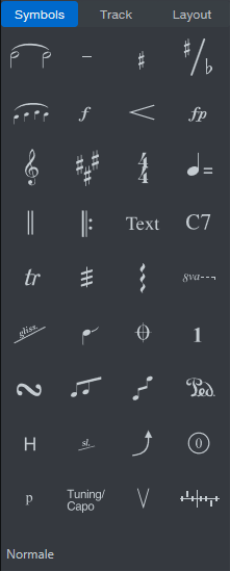
After selecting a symbol, you must click a note to anchor the symbol. Some of the symbols indicate changes that are made over time, and in that case, you must click-and-drag across a range of notes.
Most of these Symbols can also be assigned to trigger Sound Variations, allowing for a method of assigning these performance techniques in a manner more intuitive to composers. Visit Sound Variations to learn how to set it up!
- Tie: These are placed between two or more identical pitches that are adjacent, either inside a bar or across a bar line. The notes can have different values.
- Articulation: Select the appropriate icon for various types and combinations of staccato and accent. Accidentals: The key signature dictates whether a note is part of the scale or not. Accidentals are used to mark a note that is outside the scale, such as an Ab in the key of F major. Single, double, and natural options are available.
- Enharmonic spelling: Use this to change the enharmonic spelling of a note (e.g., from Eb to D#, or vice versa).
- Slur: After selecting this option, click the first note and then drag the slur to the end note in the group of notes to be slurred. These can be placed above or below the staff, and can be nested inside longer slurs. Once you have placed a slur you can adjust its overall position, its start and end point, and the curve itself. To do this, use the Arrow tool to select the existing slur, and then use the slur control points to adjust the slur as desired.
- Dynamic: Select one of ten options that range from pppp (Piano piano pianissimo) to ffff (Forte forte fortissimo).
- Hairpins: These markings indicate a gradual increase or decrease in dynamics. Select the appropriate option, click a note, and then drag the hairpin to the end note or bar line by which the change in dynamics should be complete.
- Articulations of force: These indicate a sudden, forceful change in dynamics. The fortissimo options tell the musician to play with even greater forcefulness.
- Clef: There are ten clef options in order to add clef changes throughout your track. Note that if you use the Staff Preset (in Track options), clefs will be assigned for you.
Key Signature: Use this to change the Key Signature of your Session. After selecting this option, click wherever you would like to change the key signature within the score. Double click an existing key signature to edit it.
Time Signature: Use this to change the Time Signature of your Session. After selecting this option, click wherever you would like to change the time signature within the score. Double click an existing time signature to edit it.
Tempo: Use this to change the Tempo of your Session. After selecting, click wherever you would like the tempo to change within your score either with a metronome mark change, or using rit (ritenuto or slowing down). or accel. (accelerando or speed up) Double click existing Tempo marks to edit them. See below "Tempo" for more
Bar Line: Select between double or final barline. Use this to place a barline anywhere within your score.
Repeats: Select between Repeat Start or Repeat End, and Repeat Ending tool.
Place a repeat start and end symbol anywhere within your score to create a repeated section. Double-click the end repeat line for a multiple repeat marking.
You can optionally add a Repeat Ending bar (or “1st time bar”) - create the repeated section first, select the Repeat Ending tool, then place where the first time ending should begin. The final time ending bracket will be created automatically after the Repeat End bar. Double click the first time bracket to create multiple passes.
Repeated sections are ‘unrolled’ and indicated in the arrangement window with a “ghost copy.” Asterisks by the bar number in the Timeline appear, to indicate repeats (when bars are displayed in the ruler). Instrument tracks that appear in the score (i.e. tracks with beats as a timebase) will “unroll” by default - other instrument tracks and audio tracks will not. However you can change this behavior for any track by selecting the “Follow score” checkbox in the main Track Inspector.
Scores with repeats sent directly to / from the Fender Notion app are also supported. Note that if there are repeats within Jump Marks (e.g. a repeat within a “DC al Coda”), then on the DC, the repeat is not traditionally observed.
Text: Select between adding a text box, lyrics or rehearsal marks.
The text box can be used for any custom instructions or techniques, or even notes for other collaborators.
Enter Lyrics by selecting the tool and clicking underneath the first note you wish to start. Click underneath existing lyrics to add additional verses. See below “Lyrics” for more information.
Rehearsal marks can also be helpful for creating quickly identifiable checkmarks for musicians to refer to during rehearsal. Double click them to edit individual ones or to restart a sequence. If you use letters or numbers, Studio Pro will continue in sequence automatically.
Chord: Use this to place a chord anywhere in your score. Double click to edit existing chords. Chords follow any instrument transposition set, and they are displayed above staff lines with a number of display options. You can also elect to view chord diagrams. Chords are synced with the global chord track - you can choose to show/hide chords on a per part basis in the track’s Layout options For more about the chord selector, see Chords below.
- Trill: There are three choices: Trill, Trill sharp, and Trill flat. Trills are always above the original pitch, but the width of a trill depends on the enharmonic relationship of the note to the key of the Session; it could be a half-step higher, a whole step higher, or as wide as a minor third higher than the original pitch. Click a note to add a trill, or click the note and drag to show a longer trill.
- Tremolo: There are two types and a total of six options. You can use a tremolo marking as a shorthand to represent repeated rhythmic figures. A single slash tremolo is an eighth note tremolo, a double slash tremolo is a sixteenth note tremolo, and a triple slash represents a faster "unmeasured" tremolo.
- The single note tremolo (or slash tremolo) affects the single note or chord to which it is applied.
- The two-note or fingered tremolo (or shake) is a tremolo between two alternating notes or chords. Fingered tremolo is represented by a unique form of notation, in that the total duration of the tremolo is the count of one of the notes.
- Arpeggio: There are three choices: standard (up), up (with an up arrow), and down (with a down arrow). This only works on a chord (i.e., notes that are stacked on the same event). Remember this a note effect; it does not change the position of the original notes in Piano view or Drum view.
- Octave signs: There are four options: 1 octave up or down, and 2 octaves up or down. Select one, then click-and-drag across the range to be transposed. This is a note effect; it does not change the original notes in Piano view or Drum view.
- Glissando/Portamento/Slide: Select the preferred option, then click a note to add the effect between it and the next note.
Jazz Bends: Choose between six Jazz Bend options, including Rip, Scoop, Doit, Short Fall, Shake, or Long Fall.
Jump Marks: Jump marks include traditional flow instructions such as DC (da capo) and Coda. Repeated sections are “unrolled” and indicated in the arrangement window with a “ghost copy.” An asterisk by the bar number in the Timeline appears to indicate a repeated section (when bars are displayed in the ruler). Instrument tracks that appear in the score (i.e. tracks with beats as a timebase) will "unroll" by default - other instrument tracks and audio tracks will not. However you can change this behaviour for any track by selecting the "Follow score" checkbox in the main Track Inspector. Scores with Jump Marks or flows sent directly to/from the Fender Notion app are also supported. Note that for playback to occur, all marks need to be added and in the “correct” order. For example, adding a DC and Coda would require 3 Jump Marks: "To Coda"..."DC al Coda"..."Coda" (in order of appearance in the score).
Fingering: With this tool, you can specify how finger placement corresponds with the score notes. Right-click to select the appropriate finger and place the fingering onto the desired note. You can add fingering numbers to single notes, or stack multiple fingerings vertically above or below chords. To enter a finger substitution, hold [Shift] as you enter the second number.
Ornament: Choose between ten Ornament symbols and place the chosen symbol wherever you would like to further embellish your score.
Edit Beaming: Select this to adjust existing beams between two notes. This allows separating two beamed eighth notes, for example, into individually stemmed notes
Cross staff beaming: This tool is visible only when an instrument with a grand staff (consisting of two staves, one for each hand) is selected such as piano or harp. First add all notes and any custom beaming required in the same staff. Then select the tool and click on notes you wish to be played by the other hand. The notes will then be moved to the other staff, whilst still beamed to the original staff.
Pedal: Choose between the pedal down (held down) and pedal up (release).
Guitar Techniques: There are nine classic guitar technique symbols to choose from, including hammer on, pull off slap, and palm mute.
Slides: Slide up and down lines can be added.
- Bends: There are thirteen options for bends, vibrato, and whammy bar! Select the preferred options, then click a note to add the effect. Some options, like Bend String, support multiple notes at a time. Once added, you can drag the bend to alter either its length or how wide the bend should be in terms of pitch.
Guitar String: Select a string number from 1-7 to add circled string numbers to classical guitar notation.
Fingering (Guitar): With this tool, you can specify how finger placement from your plucking hand corresponds with the score notes. Right-click to select the appropriate finger and place the fingering onto the desired note. The letters indicate the following: p (thumb), i (index), m (middle), a (ring), and c (pinky).
Tuning/Capo: Use this tool to indicate where a capo/new tuning (up to 16 frets) is needed in a score. Click onto the measure where the capo/tuning is needed and specify the capo position with the window that appears. When using Capo, the tab numbers stay the same, but standard notation and actual playback is transposed accordingly.
String Technique: Select from a number of string technique tools, such as up and down bows, con and senza sord, arco and pizziato, and open circle.
Drum Technique: This tool is visible only when a drum or percussion instrument is selected. Select from L and R sticking, and open, closed and half-closed symbols.
Harp Diagram: This tool is visible only when an instrument with a grand staff (consisting of two staves, one for each hand) is selected such as piano or harp.Select the tool and click into the staff where you want to position a harp pedal change. Within the harp dialog, you can choose between showing the full diagram or just the pitches of changed pedals. Double click an existing diagram to edit. Harp pedal diagrams affect the playback of printed glissando lines giving you more control over the resulting scale played.
Other: Contains a “normale” symbol, used to cancel a previous playing technique. For example, it would be used after “sul ponticello” (bow towards the bridge) to mean the string player returns to bowing normally. Normale is very useful in triggering the correct Sound Variation when multiple conditions need to be met - see the Sound Variations chapter for more on combining musical symbols.
There are two types of tremolo in Fender Studio Pro:
Track Panel
The Track Panel helps you configure the Score quickly and properly for each Track. Its settings only affect Score view for the Track that is selected in the Inspector, even when more than one Track is visible in the Score. These settings also determine the appearance of the printed Score, as described below.
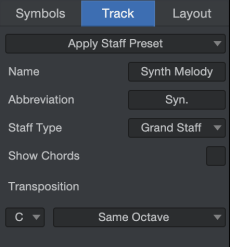
- Apply Staff Preset: Click the arrow to open a list of preset staves that are grouped in various categories (Strings, Woodwinds, Drums/Cymbals, Vocal, etc.). Each preset staff automatically selects the appropriate Transposition value and other settings for the instrument. For example, when the Alto Sax preset is selected, the Transposition becomes Eb since an alto saxophone is an Eb instrument. The key signature of the Track is also transposed accordingly; e.g., if the Session is in G, the Alto Sax staff is displayed in the key of E.
- Name: This field is automatically filled with the name of the Track. It can be edited here, which also edits it there, and vice versa.
- Abbreviation: An abbreviation for the selected Staff Preset is entered automatically, but you can enter a different one if you like.
- Staff Type: Six options: Standard (one staff), Tablature, Standard + TAB, Grand Staff, Drumset, and Single Line. The appropriate setting is chosen automatically for the selected Staff Preset, but you can override that if you want.
- Show Chords: Tick the box to show Chords from the Chord Track in the selected staff. Chords will automatically display the correct transposition if the staff is for a transposing instrument.
- Tab Type: Available only with the Staff Type set to Tablature or Standard + TAB, this field lets you choose from a diverse list of 14 fretted instruments of various string counts and tunings for use with the Tablature editing interface.
- Tab Strings: Displays the default tuning for the instrument selected in the Staff Preset if it’s a stringed instrument. Click to enter your own alternate tunings via the keyboard, if desired.
- Circles in TAB: Tick to display circles around the fret numbers in the Tablature for half and whole notes.
- Show Stems in TAB: Tick to display stems under the fret numbers in Tablature. These will align with the stems of notes displayed in the Standard + TAB Staff Type.
- Transposition: There are two settings available here:
Transposition key: This sets the Transposition key of the instrument. The correct setting is chosen automatically for the selected Staff Preset. For example, a setting of Bb is chosen for a clarinet or a tenor sax, since they are Bb instruments. Hover over the key dropdown as a handy tooltip of what this effect this will have, i.e. “A notated C sounds…” In this example, a notated C sounds ‘Bb’.
- Octave: This lets you place the score in the most readable range (i.e., the minimal number of ledger lines). Settings include Same Octave (no octave shift), or +/- up to 2 octaves.
Note: There are instruments in C but still have an octave transposition so that their notes still center around the readable staff. These include orchestral instruments such as piccolo and double bass, but crucially also, guitar and bass guitar.
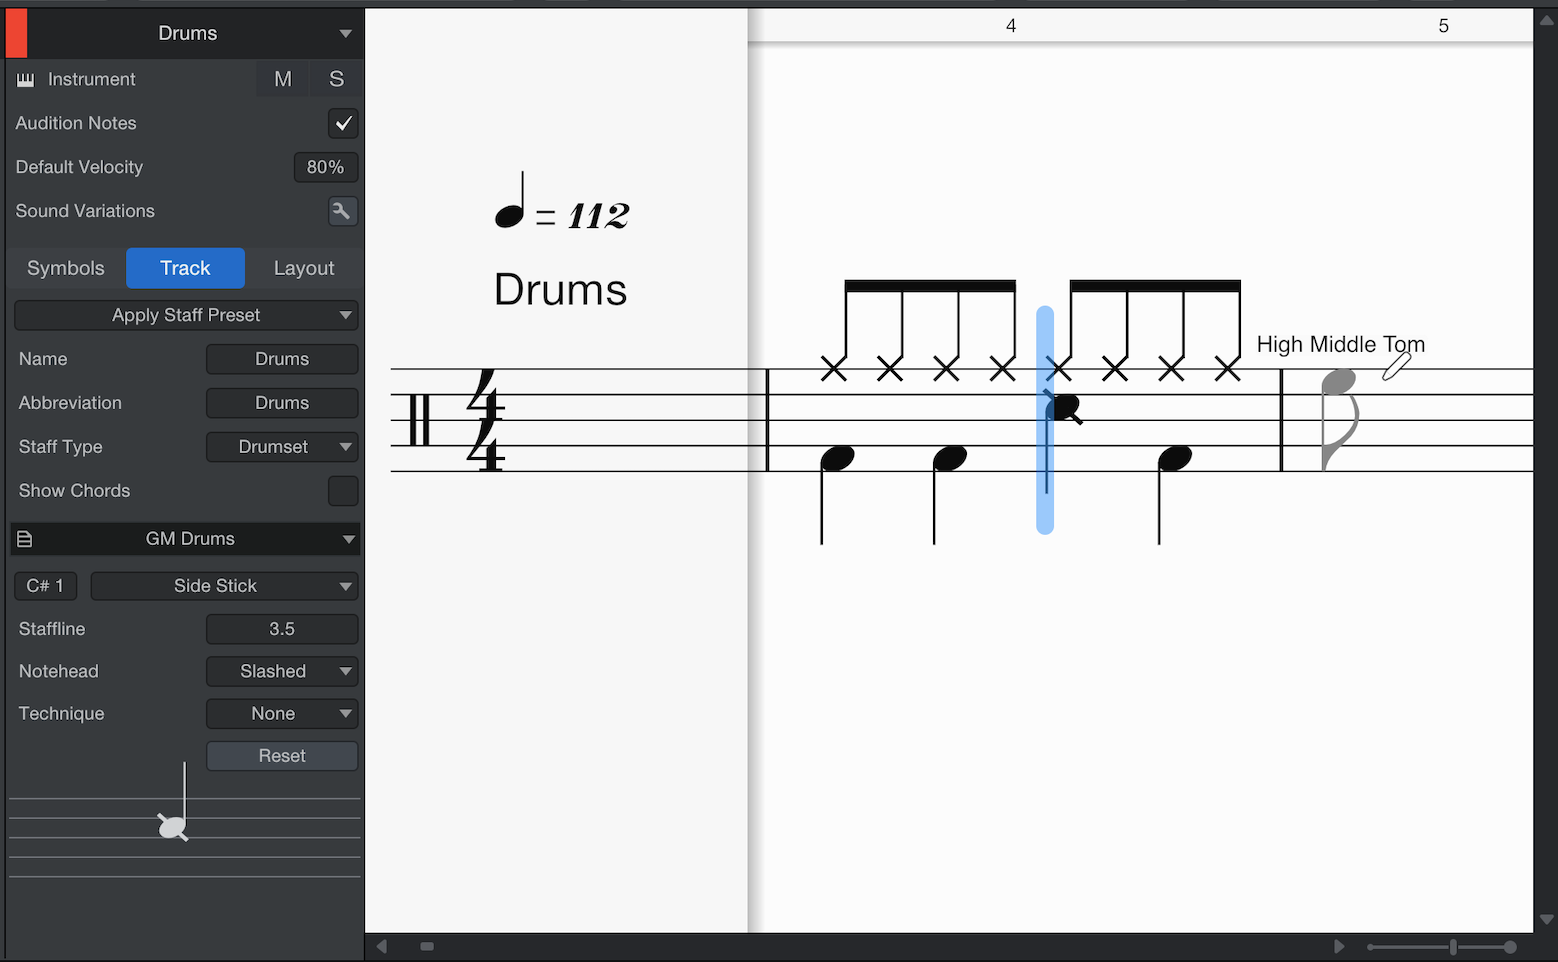
Drum Mapping: If a drum virtual instrument is loaded, and the Staff Preset is set to Drums or other unpitched percussion, then a Drum mapping tool is available. This allows you to map a notated pitch to the actual MIDI pitch of the sample - this is useful as often the MIDI pitches of the sample for drums are outwith the range of a readable staff. If a virtual instrument provides the names for the drums, then these will be displayed in a dropdown. If not, then you can create or load existing map presets - Studio Pro comes with a General MIDI preset, which is a handy starting point for creating custom maps. Select the drum name, then set the pitch, notehead, and technique you want. You can drag the preview note up and down, for quick mapping. You can also adjust any existing notes in the score with this tool as well, if you change your mind or want to apply a different mapping.
Layout Panel
There are three layouts available in the Score View: Continuous, Pages (Full Score), Single Track (Single Part). The settings of the Layout panel apply to each view independently and will update depending on the currently selected view. This allows you to have different settings for an individual part as compared to the full score.
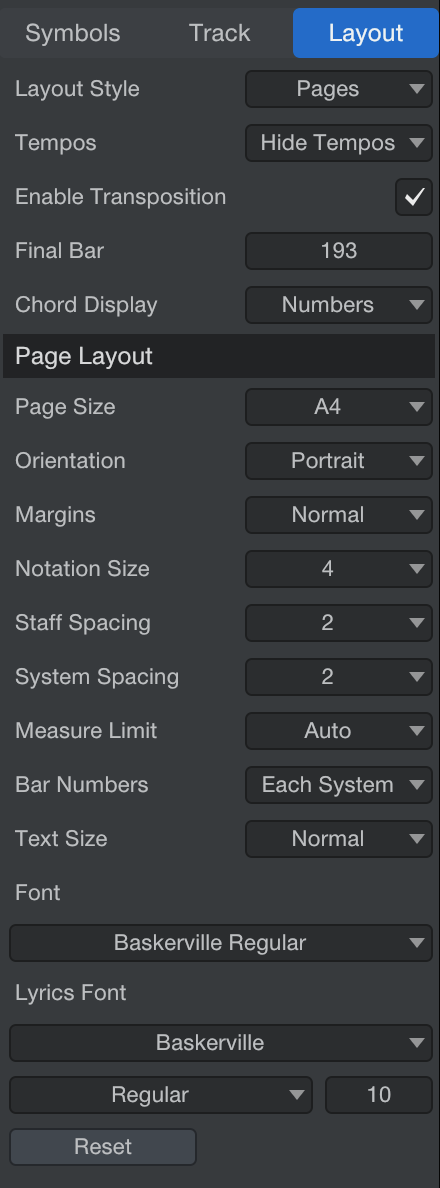
- Layout Style:Lets you select the desired layout. It is linked to the toolbar buttons; change one and the change is made in both places.
- Continuous: Can display multiple tracks horizontally with no page breaks, similar to the Arrange view. Nothing can be printed when this option is selected, so the Page Layout settings are hidden. Note also that the Session meta-information is not displayed at the top of the layout (Title, Composer, etc.).
- Pages: Can display and print multiple Tracks. The number of Tracks that can fit on a page is determined by which Tracks are shown or hidden in the Track List and the Page Layout parameters described below.
- Single Track: Displays and can print the most recently selected Track.
- Tempos: Lets you specify whether all tempo settings are shown (Show Tempos), all are hidden (Hide Tempos), or only the initial tempo is shown (First Only).
- Enable Transposition: Allows the key signatures within the Track to change when the Track is transposed. To prevent this, uncheck the box.
- Final Bar: Lets you specify the exact number of bars you would like displayed in the score.
- Chord Display: Lets you select the desired Chord Display mode and style. You can select from a number of options - for more information about Chord Display, see Chords below, or The Show Timeline.
Page Layout
All of the settings below this divider let you specify the final printed output (notation size, etc.), and also determine how the Score is rendered on your display. They are not available for the Continuous page layout. Note that the Multi-Measure Rests setting is only available for the Single Track page layout.
- Page Size: Click the arrow to open a list of standard printing formats.
- Orientation: Select Portrait or Landscape orientation for the Score. This allows for different sizes of monitors, sheets of paper, etc.
- Margins: Depending on the printer and whether the final result will be bound or loose leaf, these settings let you specify how close to the edge the music can be.
- Notation Size: Lets you adjust the size of the notes and other markings in the Score.
- Staff Spacing: This sets the amount of space between the staves in a system.
- System Spacing: This allows you to specify the amount of empty space between systems (i.e., groups of staves). If only a few instruments are used on one Session, a larger value can make the Score easier to read. But if the Session uses a full orchestra a lower value helps fit all the instrument parts on a single page. Use in conjunction with the Notation Size and Staff Spacing settings for optimal viewing.
-
Measure Limit: This forces a specific number of measures into a single system. Useful, for example, for creating a uniform 4 measure per system lead sheet. Note this has spacing minimums for legibility, so if there are too many notes then this will be overridden. In this case, consider reducing the notation size and/or increasing the page size.
- Multi-Measure Rests (Single Track only): This consolidates adjacent measures of rests into a single measure, with a number to indicate how many empty measures should be consolidated into one multi-measure rest. If you want all empty measures to be shown individually, select None.
- Bar Numbers: Use this to specify whether you want to hide the bar numbers (None), have them appear only over the first bar in each set of staves (Each System), or over every bar (Each Measure).
- Text Size: This adjusts the size of the font used for the Song Title, Album, and Songwriter/Composer fields. Select No Titles to hide that information; the rest of the options display those fields in the size you select: Tiny, Small, Normal, Medium, Large, or X-Large.
- Font: Use this menu to select the text font for viewing and printing the Score. Quite a bit of personalization can be done here, so your charts are distinctive. You can even use a different font for each Session, if you like.